
You don’t need a dedicated chatbot plugin to add an AI chatbot to WordPress. Most business AI chatbots run on their provider’s servers and join your site through one small snippet of code. So the job is two steps: train the chatbot on your own website, then paste one snippet into your site’s footer. Allow about 20 minutes, most of it spent waiting while the chatbot reads your pages.
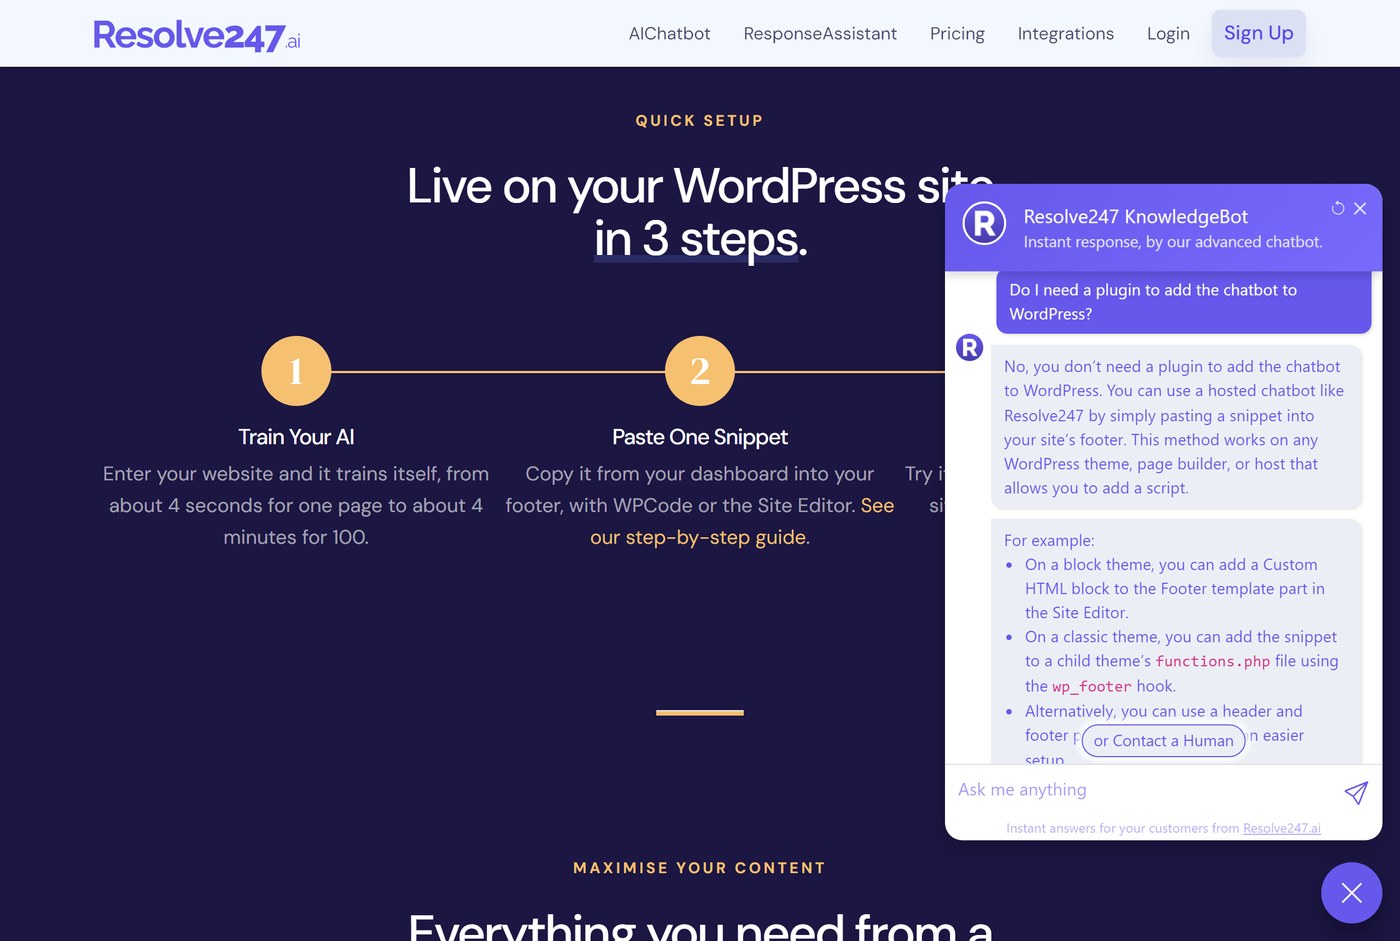
This blog runs on WordPress, and the chat bubble in the corner went in exactly this way. Here’s the same chatbot answering whether you need a plugin, from our own pages:
This guide covers the steps, plus the parts most guides skip. That means block themes (there’s no footer.php to edit any more), testing answers before visitors see them, and where conversations go when the chatbot can’t help. It also covers showing it on some pages only, fixing a chatbot that won’t appear, and what it costs your page speed. We measured it.
Disclosure: we make Resolve247, an AI support chatbot, and use it as the worked example. Any hosted chatbot that gives you a script tag installs the same way.
What You Need Before You Start
- Admin access to WordPress. You need the Administrator role to install plugins or edit your theme.
- A WordPress site that can run scripts. Self-hosted WordPress is fine. On WordPress.com, every paid plan from Personal upwards can add plugins and scripts once hosting features are activated. The Free plan strips scripts out.
- The content you want it to answer from. Your FAQ, delivery and returns pages, help docs, policies, and product pages. A chatbot answers from what you give it, so thin pages make thin answers. Have any policy PDFs or Word documents ready to upload too.
Plugin or Snippet? Two Ways an AI Chatbot Runs on WordPress
Search the plugin directory for “AI chatbot” and you’ll find over 1,000 results, which makes a plugin look like the only route. It isn’t.
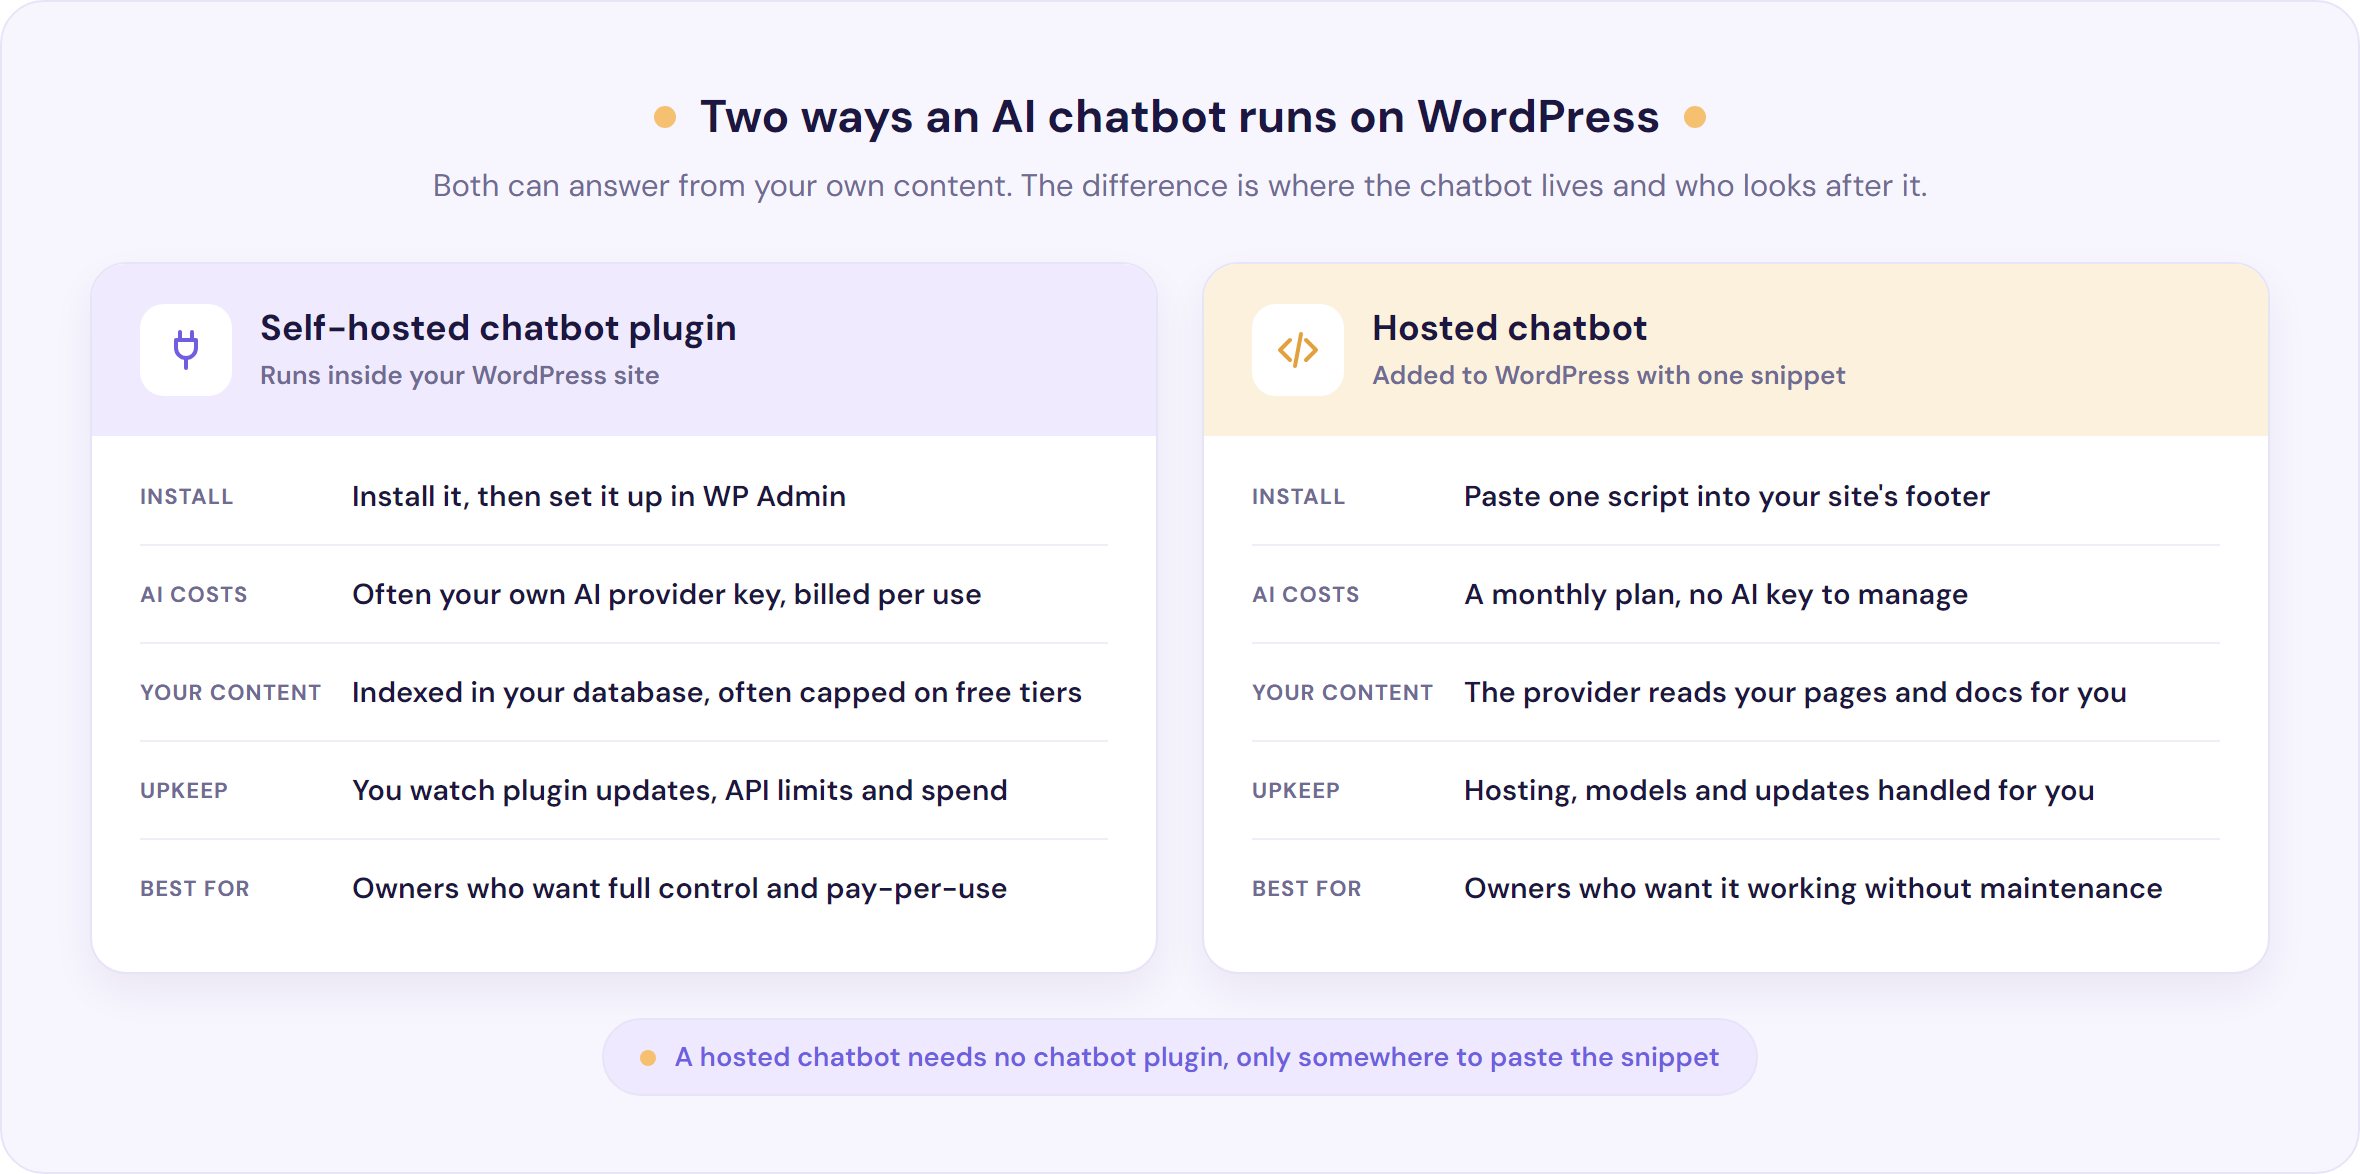
A self-hosted chatbot plugin runs inside WordPress. You install it, then connect it to an AI model, often with your own key from OpenAI or another AI provider, who bills you for every conversation. Your content is indexed in your WordPress database, and you look after updates, API limits, and spending. Free versions often cap how much content they’ll index.
A hosted chatbot runs on its provider’s servers. It’s trained and hosted for you and joins your site through a snippet in your footer. You pay a monthly plan instead of an AI bill, with no key to manage. And because it isn’t a plugin, it works the same on any theme, page builder, or host that lets you add a script.
If you enjoy tinkering and your volume is low, a self-hosted plugin with your own key can be cheap. If you want accurate answers without a maintenance job, a hosted chatbot is simpler, and it’s what this guide covers. Still choosing a tool? Our guide to the best chatbot for WordPress compares seven, with what each costs at 300 chats a month.
(Want ChatGPT itself on your site? It answers from its own training rather than your content, so read our guide to embedding ChatGPT in your website first.)
How to Add an AI Chatbot to WordPress, Step by Step
Here’s how to add an AI chatbot to WordPress from start to finish, using Resolve247 as the example. Steps 3 to 5 are the same for any hosted chatbot.
Step 1: Train the Chatbot on Your Website
Start a free 30-day trial (no card needed). Enter your website, company name, and email, then click Train my AI.
Your homepage address is enough: it looks for your sitemap, follows links across your site, and is ready in a few minutes. If it misses pages, add your sitemap on the Knowledge page (WordPress builds one at /wp-sitemap.xml, or /sitemap_index.xml with Yoast or Rank Math). You can also upload files (PDF, Word, Excel, PowerPoint, CSV, or text), connect Notion, or type “knowledge snippets” for anything that isn’t written down yet.
Step 2: Test the Answers Before It Goes Live
Every new chatbot gets a test page you can use, and share with a colleague, before any visitor sees it. Five checks, five minutes:
- Ask the 10 questions you answer most often, in your customers’ words. Copy them from your inbox.
- Ask something your site doesn’t cover. It should say it doesn’t have that information and offer a person, not guess.
- Click the source links under each answer. They should point to the right page.
- Ask a misspelled, half-finished question, the way real customers type.
- Press Contact a Human and check the message reaches you.
If an answer is wrong, the fix is almost always the page, not the chatbot: make the page clearer, refresh it, and ask again.
Step 3: Copy Your Embed Snippet
In your Resolve247 dashboard, open your chatbot’s Settings, expand AIChatbot Options and scroll to Embedding Your Resolve247 Chat Widget. Click Copy Code. (During setup, Add to my site shows the same snippet.)
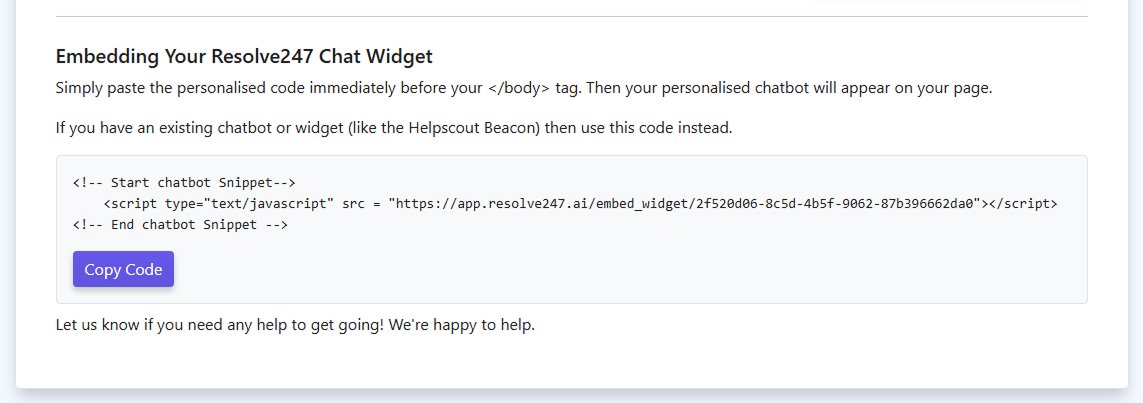
It looks like this, with your own key in place of the placeholder:
<!-- Start chatbot Snippet-->
<script type="text/javascript" src="https://app.resolve247.ai/embed_widget/your-unique-key"></script>
<!-- End chatbot Snippet -->
Step 4: Paste It Into Your Footer With WPCode
The easiest way to put a script on every page is a small header and footer plugin. It isn’t a chatbot plugin: it prints your snippet on every page and survives theme updates and switches. One option is WPCode, which has over 3 million active installs and does this for free.
- Go to Plugins > Add Plugin and search for WPCode.
- Click Install Now, then Activate. (A different plugin called “Insert Headers And Footers” by WPBrigade appears in the same search, so check the author is WPCode.)
- Go to Code Snippets > Header & Footer.
- Paste your snippet into the Footer box and click Save Changes.
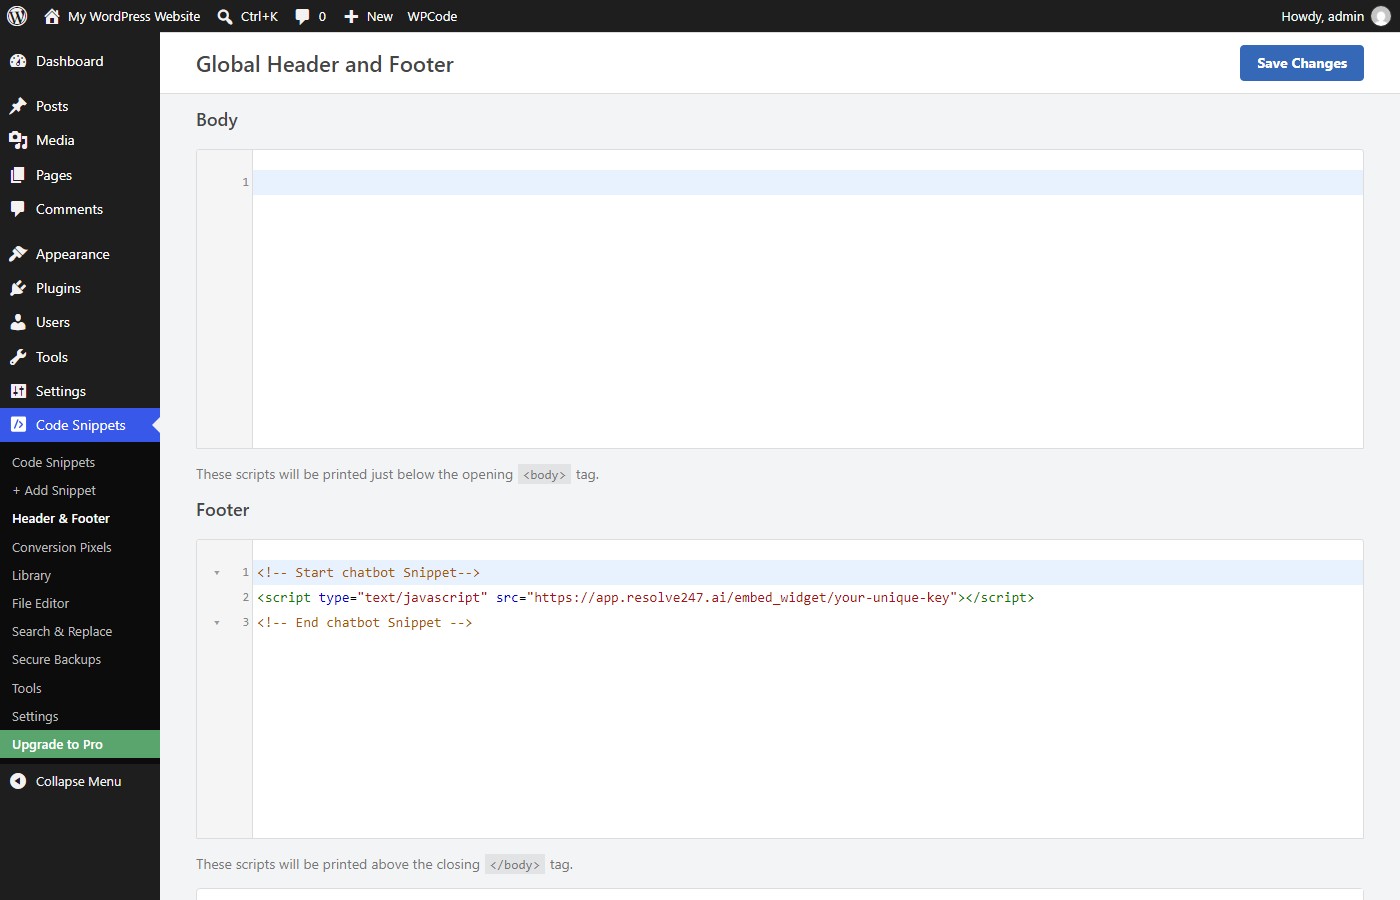
We tested this on a fresh WordPress 7.1.2 site with the default Twenty Twenty-Five theme, and the chat bubble appeared as soon as we saved. This blog uses a different plugin for the same job, Simple Custom CSS and JS (Add Custom HTML, set to Footer and In Frontend).
Step 5: Clear Your Cache and Check It as a Visitor
If you use a caching plugin, or your host caches pages, clear the cache now, or visitors will keep getting old copies without the snippet. Then open your site in a private window (so you’re logged out) and on your phone. The chat bubble should appear in the bottom-right corner. If it doesn’t, see the troubleshooting table below.
On your phone, check it doesn’t cover your Add to cart button or cookie banner. If it does, switch its Position to the left on the Customise page.
Step 6: Decide Where Handovers Go
A good chatbot knows when to step aside. When a visitor needs a person, they press Contact a Human and leave their name, email, and message, with the conversation attached. By default that goes to your email inbox, and you can also send it to Slack or a Help Scout mailbox, or send visitors to your own contact page. Check the notification address before you go live.
Already answering live chat in HubSpot or Crisp? You don’t need a second chat bubble: the same AI can answer inside your existing widget and hand over to your team there (see our HubSpot and Crisp integrations).
How to Add an AI Chatbot to WordPress Without a Plugin
Prefer not to add a plugin? Where the snippet goes depends on your theme or page builder.
Block Themes: Use the Site Editor Footer
Most new themes, including the default Twenty Twenty-Five, are block themes. They have no footer.php to edit, so the no-plugin route is the Site Editor:
- Go to Appearance > Editor > Patterns, open Template Parts and choose Footer.
- Add a Custom HTML block at the bottom of the footer (type
/html). - Click Edit code, paste your snippet into the HTML panel and click Update.
- Click Save.
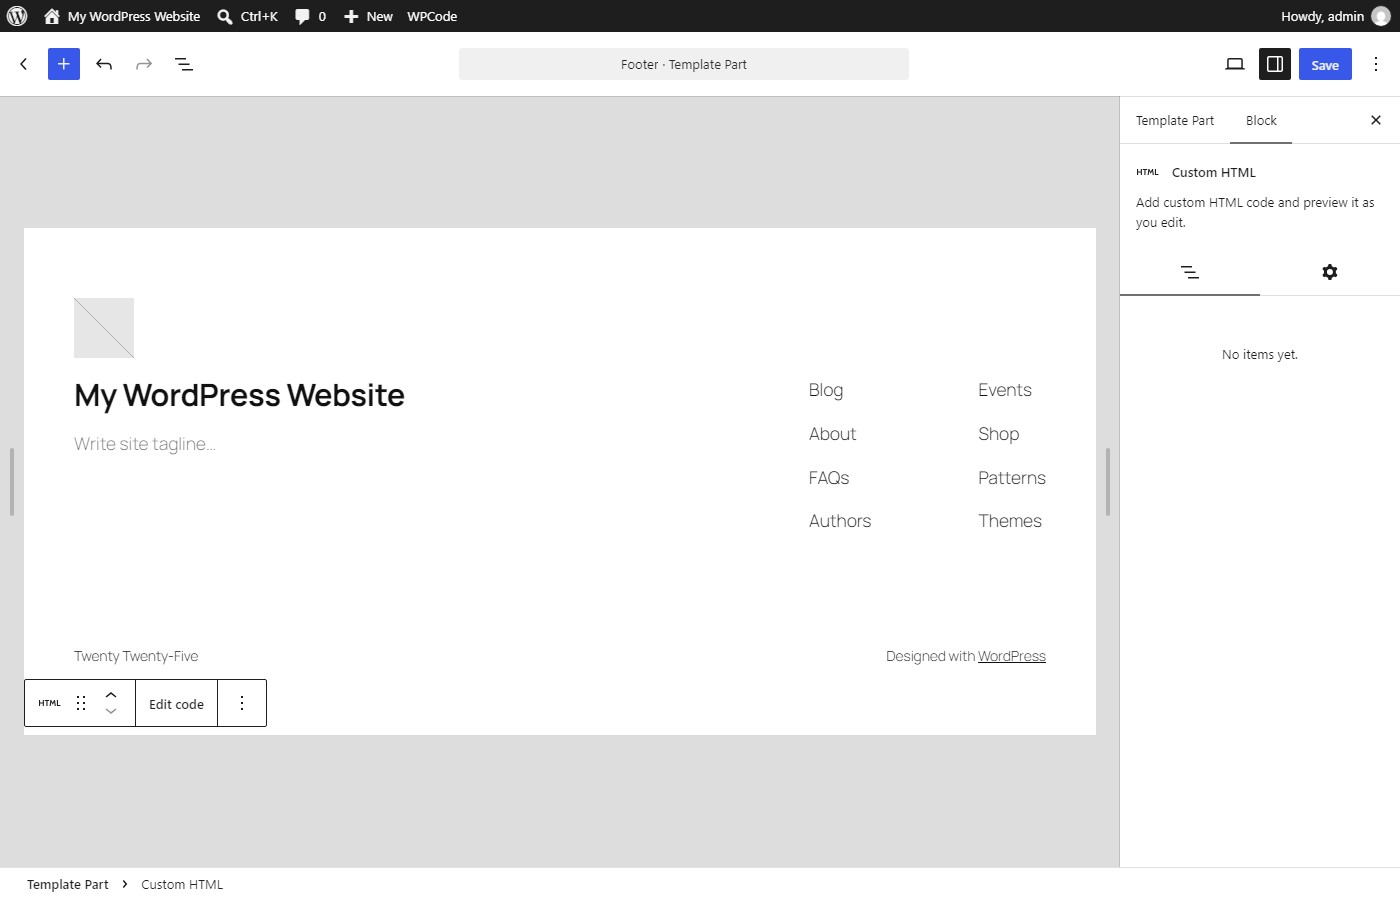
There are two catches. First, WordPress only keeps a script in a Custom HTML block if the person saving it is allowed to add unfiltered HTML. Administrators on a normal site are, but on a multisite network only Super Admins are, and some hosts switch it off for everyone. If your snippet vanishes after saving, that’s why, and WPCode gets round it.
The second catch: WooCommerce’s block checkout page doesn’t use your footer template part, so the chatbot won’t appear at checkout this way.
Classic and Child Themes: Use functions.php
On a classic theme, don’t paste the snippet into the theme’s own footer.php: the next theme update wipes it. If you use a child theme, add this to its functions.php instead:
add_action( 'wp_footer', function () {
    echo '<script type="text/javascript" src="https://app.resolve247.ai/embed_widget/your-unique-key"></script>';
} );
wp_footer runs on every front-end page just before </body>, so this works with any standards-compliant theme.
Page Builders
- Elementor Pro: Elementor > Custom Code > Add New Custom Code, and set the location to the end of
<body>. (The free version doesn’t have this; use WPCode.) - Divi: Divi > Theme Options > Integration. Turn on Enable body code and paste into Add code to the < body >.
- Bricks: Bricks > Settings > Custom code > Body (footer) scripts.
How the options compare:
| Where you paste it | Extra plugin? | Skill needed | Kept after a theme update? | Kept if you change theme? |
|---|---|---|---|---|
| WPCode Footer box | Yes (free) | Copy and paste | Yes | Yes |
| Site Editor footer (block themes) | No | Copy and paste | Yes | No |
| Child theme functions.php | No | Comfortable with PHP | Yes | No |
| The theme’s own footer.php | No | Comfortable with PHP | No | No |
Show the Chatbot Only on Certain Pages
The snippet loads on every page by default, which suits most sites. To keep it off some pages, such as checkout or a campaign landing page, set that up in WordPress:
- With WPCode (free): instead of the Header & Footer screen, go to Code Snippets > + Add Snippet and create a custom HTML Snippet with your chatbot snippet. Set the location to Site Wide Footer, turn on Enable Logic under Smart Conditional Logic, and add a rule such as Hide when Page URL contains
/checkout. Page URL rules are free; picking individual posts from a list needs WPCode Pro. - Open it from your own button: switch off Widget Button on the Customise page to hide the floating bubble, then open the chat from a button on the pages you choose, such as your contact page. If your speed plugin delays JavaScript, exclude the snippet from the delay, or the first click can do nothing.
<button onclick="Resolve247Widget('open')">Chat with us</button>
How “Trained on Your Own Content” Works
“Trained on your content” doesn’t mean the AI model is rebuilt around your site. It works more like a librarian. For every question, the chatbot searches the pages, files, and snippets you gave it. It picks out the passages that match what the visitor means, not just the words they typed, then writes an answer from them. The technical name is retrieval-augmented generation.
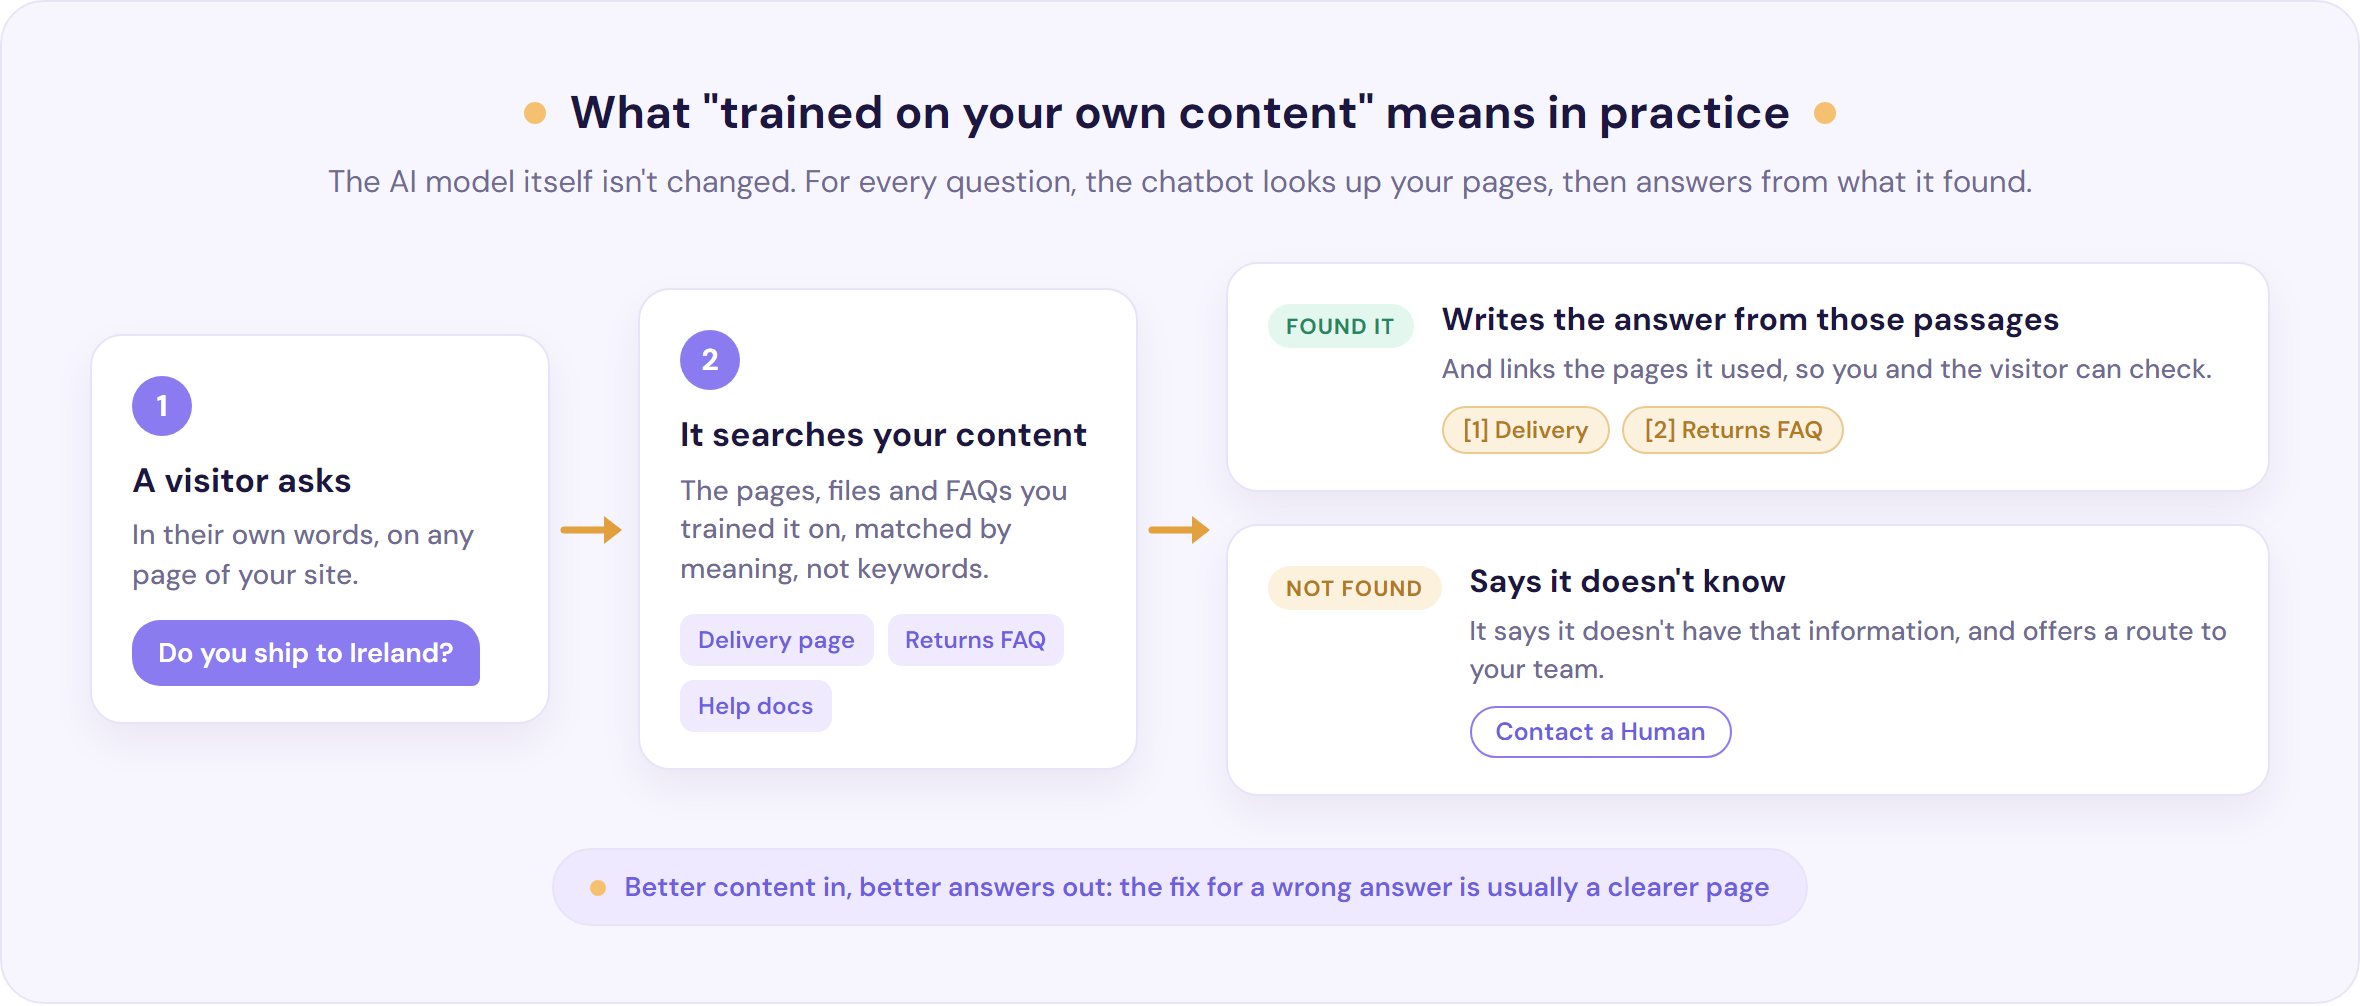
For a support chatbot, two behaviours matter most:
- It shows its sources. Every answer links the pages it came from (on by default), so anyone can check it.
- It admits what it doesn’t know. Resolve247 is instructed to answer from your content, not the AI model’s general knowledge. When your content doesn’t cover a question, it says it doesn’t have the information and offers a person. We back that with a guarantee: if it ever hallucinates, that month’s chatbot is free. More on how accurate AI support chatbots really are.
Keeping it accurate is mostly about keeping your pages accurate. When you change a page, click Refresh all existing URL(s) on the Knowledge page (plans from Core upwards also retrain automatically: monthly on Core, weekly on Pro, daily on Scale).
Then check the Knowledge Gaps report under Analytics, which lists the questions the chatbot couldn’t answer. People usually open a chat because your pages didn’t answer them, so each gap is a page or paragraph worth writing. If most of your answers live in a help centre, a knowledge base chatbot is the same idea pointed at your docs.
Adding It to a WooCommerce Store
WooCommerce is a normal WordPress plugin, so the same snippet works on shop, product, and cart pages with nothing extra. Point the chatbot at your product pages, delivery and returns information, and size guides, and it will handle the questions that fill a store’s inbox: “Do you ship to Ireland?”, “How do returns work?”, “Does this run small?”
For “Where’s my order?”, it points customers to their account page or hands over to you, because it answers from your pages rather than your order system. Before launch, ask it for a discount code, because shoppers will. It should only mention offers that appear on your pages. There’s more on what an AI chatbot for ecommerce can handle for your store.
Chatbot Not Showing on WordPress? Fixes That Work
One complaint comes up again and again on the WordPress.org support forums: the chatbot shows for the owner while logged in, “But others can’t see it.” In that thread a caching plugin’s JavaScript optimisation was to blame, and it often is. Work down this table:
| What you see | Likely cause | Fix |
|---|---|---|
| It shows for you but not in a private window | Visitors get a cached copy (logged-in admins often skip the cache) | Clear your caching plugin, host cache, and any CDN such as Cloudflare |
| It only appears after you scroll or move the mouse | A “delay JavaScript” setting, such as WP Rocket’s Delay JavaScript execution or LiteSpeed Cache’s Load JS Deferred: Delayed | Fine to leave, as it helps page speed. To load it at once, add data-nowprocket (WP Rocket) or data-no-defer="1" (LiteSpeed) to the script tag |
| First-time visitors never see it | A consent plugin (Complianz, CookieYes, Cookiebot) holding scripts until visitors accept | Categorise the script as your privacy adviser recommends. The widget sets no cookies; it keeps a session and visitor ID in local storage |
| The snippet vanishes after saving | Your account can’t save scripts (multisite, host setting, or security plugin) | Use WPCode, or ask your host |
| The browser console says a script was refused | Your site sends a Content Security Policy header | Allow app.resolve247.ai for scripts and connections, cdnjs.cloudflare.com and cdn.jsdelivr.net for scripts, and res.cloudinary.com for images (the chat avatar) |
| Nothing at all on WordPress.com | Free plan, or hosting features not activated | Use a paid plan and activate hosting features |
| Missing inside Elementor or the Site Editor | Editors and previews don’t run footer scripts | Check the live page |
This blog sends a Content Security Policy header too, and app.resolve247.ai is on its allow list for exactly this reason.
Will an AI Chatbot Slow Down WordPress?
A little. We measured it: a plain test article with and without our snippet, loaded fresh seven times each on desktop and on a simulated mid-range phone (Chrome with the processor slowed four times, on a 4G-like connection). Figures are medians.
| Without the chatbot | With the chatbot | |
|---|---|---|
| Extra downloads | None | 11 requests, about 56 KB compressed |
| Main content visible (LCP), desktop | 168 ms | 198 ms |
| Main content visible (LCP), phone | 434 ms | 420 ms |
| Main-thread blocking time, desktop | 0 ms | 37 ms |
| Main-thread blocking time, phone | 196 ms | 786 ms |
| Chat bubble ready | No chatbot | 1.1 s desktop, 2.4 s phone |
Your content appears as quickly as before (the desktop gap sat inside our run-to-run variation), because the chatbot loads after your page. The cost shows on slower phones as roughly 0.6 seconds of extra processing while the widget starts, which can lower a mobile PageSpeed Insights score. If that score matters to you:
- Delay it until the first interaction. The “delay JavaScript” settings above load the chatbot when a visitor first scrolls or taps. Google’s Lighthouse suggests loading live chat widgets on interaction for the same reason.
- Run one chat tool, not two. Remove old live chat scripts you no longer use.
- Load it only where it helps, using the page rules above.
Frequently Asked Questions
How do I add a chatbot to WordPress without a chatbot plugin?
Use a hosted chatbot and paste its snippet into your site’s footer. On a block theme, add a Custom HTML block to the Footer template part in the Site Editor. On a classic theme, add it to a child theme’s functions.php with the wp_footer hook. A header and footer plugin such as WPCode is the easiest route of all.
Can I try an AI chatbot on my WordPress site for free?
Yes. Resolve247 has a 30-day free trial with no card needed, so you can train it, test it, and run it live before paying anything. Free chatbot plugins exist too, but most need your own AI provider key, so you still pay that provider for every conversation.
Does it work on WordPress.com as well as self-hosted WordPress?
Yes, on any paid WordPress.com plan. Since April 2026, every plan from Personal upwards can install plugins and run scripts once its hosting features are activated. The Free plan removes scripts, so upgrade to Personal or above before you paste the snippet.
Can I show the chatbot on specific pages only?
Yes. Add the snippet with WPCode’s Smart Conditional Logic and show or hide it by page URL, which is free. Or hide the floating button and open the chat from your own button on the pages you choose, such as your contact page.
Will an AI chatbot slow down my WordPress site?
In our tests, the main content appeared just as quickly with the chatbot. It adds about 56 KB, plus some processing on slower phones once the page has loaded. If your mobile PageSpeed score matters, delay the chatbot until the visitor’s first scroll or tap.
Get Your Chatbot Live This Week
To add an AI chatbot to WordPress, you paste one snippet. What decides whether visitors trust it is the pages it learns from, whether it shows its sources, and whether there’s an easy route to a person.
- No chatbot plugin needed: paste one snippet with WPCode, the Site Editor, or a child theme.
- Test before you launch, including a question it shouldn’t be able to answer.
- Keep your pages current and check the Knowledge Gaps report monthly.
This week, list your 10 most-asked questions, start a free 30-day trial (no card needed), and put those questions to your test page before you paste the snippet. If you’d rather not do the install yourself, email [email protected] and we’ll set it up with you.
See how Resolve247 works as an AI chatbot for WordPress, or, if WordPress is only part of your setup, compare the other ways to add an AI chatbot to your website.