
When using our HubSpot integration, we have a Demo page where you can test out your Resolve247 AI directly within the HubSpot widget for the full experience. Often this works straight away, but as this Demo page will use your real HubSpot widget, sometimes your existing HubSpot settings might prevent it from being displayed or from showing the right chatflow. This guide will show you how to fix two common problems.
First, please note that the below is not a requirement at all, it is only to get the HubSpot widget to display on the Resolve247 Demo page. Your real widget is probably working just fine – these tweaks are only required for the Demo page to work, so you can skip this completely if you prefer. If you have the HubSpot widget working on another page, you can use that to test if you wish. But if you do want to use our Demo page to test your HubSpot widget, then this guide will help you get this sorted!
Two common problems:
If you get stuck, we are more than happy to help! Just reach out to us at [email protected] and we’ll get you sorted in no time!
Problem: HubSpot widget not showing
In the case of the Resolve247 Demo page, this issue is likely because your current HubSpot Chatflow “Target” conditions don’t allow the widget to be loaded. Below are steps to fix this.
Not using the Demo page? If your issue is occurring on a different page, then also please check that your page includes the HubSpot Tracking Code (we automatically add this for you on your Resolve247 Demo page).
Problem: The HubSpot chat widget is not displaying at all.
Cause: Your current HubSpot Chatflow Target conditions are stopping the widget from being displayed on this page.
Solution: Add a target condition that permits this page.
We’ll assume you are trying to get the HubSpot chat widget to show on the Resolve247 Demo page, but these steps will apply to other situations too.
We would suggest that you add a new target condition (under Show Chat) to your preferred chatflow to allow the chatflow to be shown on the Resolve247 Demo page – the target condition would be:
Show Chat rule: “Website URL” -> “contains” -> “app.resolve247.ai“.
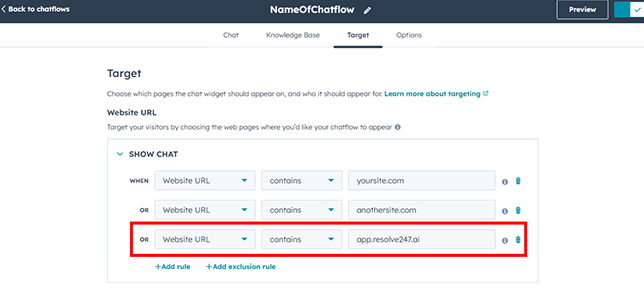
For detailed steps on how to do this, scroll down to Adding a Target condition to HubSpot Chatflow below, where in step 5 you would add a “Show Chat” rule with this suggested target condition.
We would suggest leaving your current conditions as they are and adding a new Target Condition that allows the widget to be shown as required.
Problem: HubSpot showing wrong Chatflow
In HubSpot, you can have multiple Chatflows to suit different situations. When HubSpot shows the chat widget, it decides which chatflow to display based on the first Chatflow in the list that matches the target conditions. So if the wrong chatflow is being shown, it’s likely because there is a chatflow higher in the list that meets the criteria of the page.
Problem: The HubSpot widget is showing the wrong Chatflow.
Cause: HubSpot uses the first chatflow that matches target conditions, which isn’t your intended chatflow.
Solution: Adjust your HubSpot chatflow order and/or conditions to pick your intended chatflow first.
There are a few ways this can be resolved but is dependent on how you are using Conditions at the moment. Below are some suggestions, but please be careful not to interrupt the operation of your existing live chatflows. If you need help with deciding how to resolve this, please do reach out to us at [email protected] and we’ll be happy to help.
Suggestion – make test chatflow higher priority
If you’ve created a chatflow just for testing – you could move that chatflow to the top of the list, and set your conditions so this chatflow is only ever displayed on the Resolve247 Demo page. For example you could remove any existing rules from this chatflow and add the Show Chat condition of:
Show Chat rule: “Website URL” -> “contains” -> “app.resolve247.ai“
This will mean your test chatflow will be considered before other chatflows, but will only be displayed on your Resovle247 Demo page.
For detailed steps on how to change priority, scroll down to Adjust Chatflow Priority, and for steps on how to add target conditions, scroll down to Adding a Target condition.
Suggestion – block other chatflows from showing
Or if your chosen chatflow needs to stay where it is in the list, then you can add a blocking condition to your existing chatflows (all except the test chatflow that you want to appear on the demo page), to stop them from displaying on the Demo page, so HubSpot will use your chosen chatflow. For example you could add an exclusion rule (under Hide Chat) of:
Hide Chat/Exclusion rule: “Website URL” -> “contains” -> “app.resolve247.ai“.
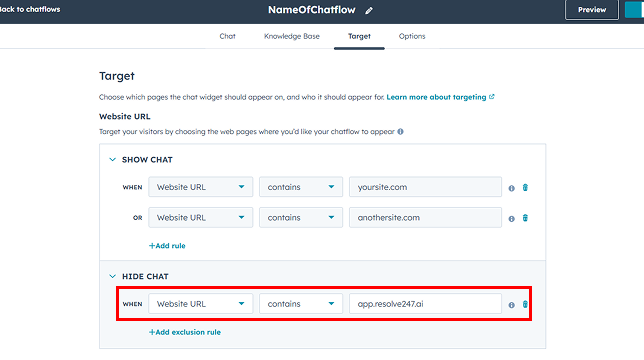
For detailed steps on adding a blocking condition, scroll down to Adding a Target condition below, where in step 4 you would click “Add exclusion rule” and then under “Hide Chat” you would use this suggested target condition.
You can of course use the concepts above and adjust them to suit your specific situation!
Adding a Target condition to a Chatflow
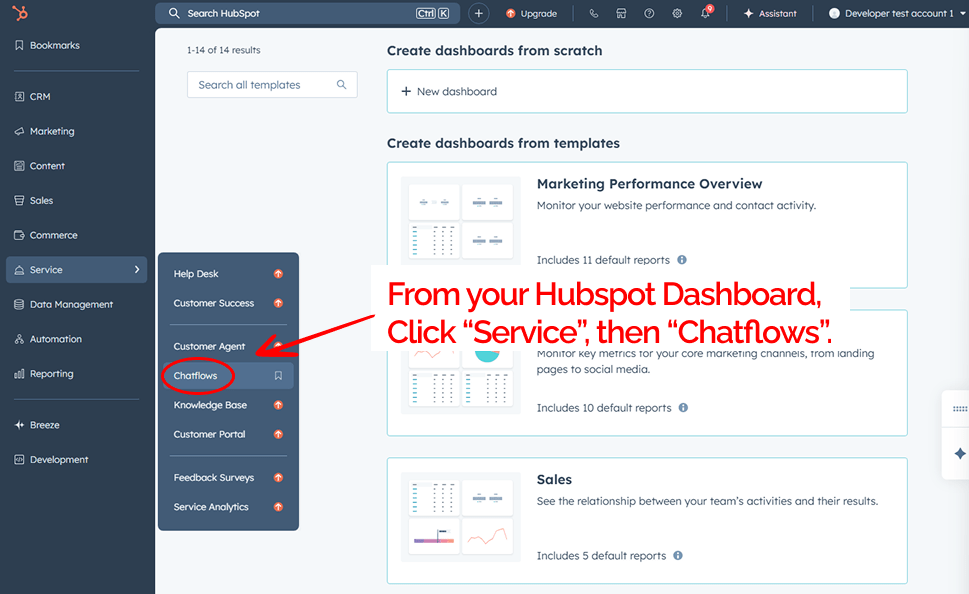
- From your HubSpot Dashboard:
- in the left hand menu, click “Service”
- then click “Chatflows”.
- Hover over the chatflow that you want to use in your HubSpot widget, then click “Edit”.

- In the top menu, click “Target”.
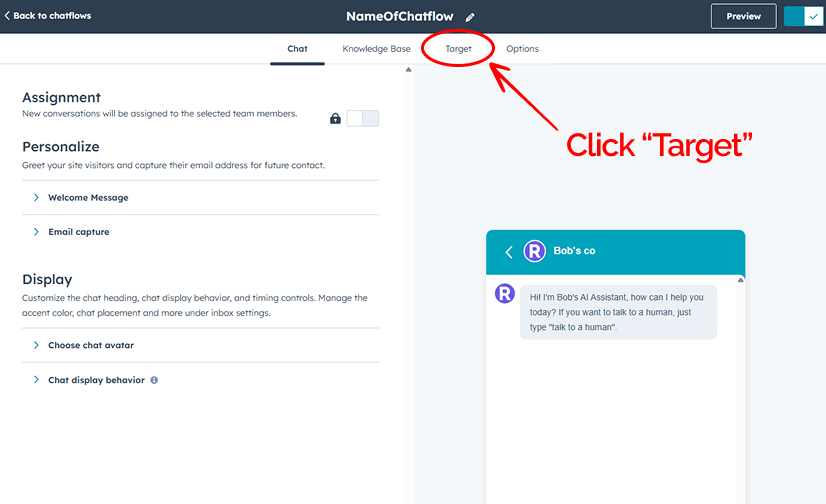
- You will see the existing conditions that apply to where this Chatflow will be displayed.
- Either click “Add rule” to add a new condition to Show Chat.
- Or click “Add exclusion rule” to add a new condition to Hide Chat.
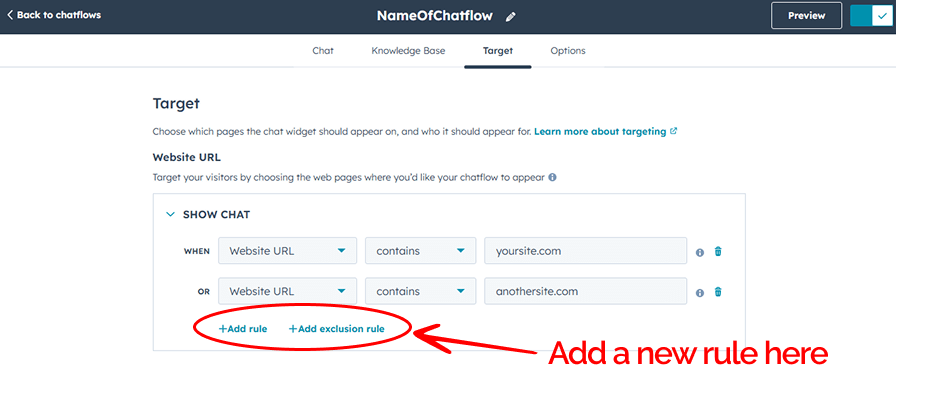
- A new row will appear.
- Amend this new row to show “Website URL” -> “contains” -> “app.resolve247.ai”.
- Click “Save” in the bottom left.

Your new condition is now saved, and the HubSpot chat widget should now be shown on the Resolve247 demo page!
Adjust Chatflow priority
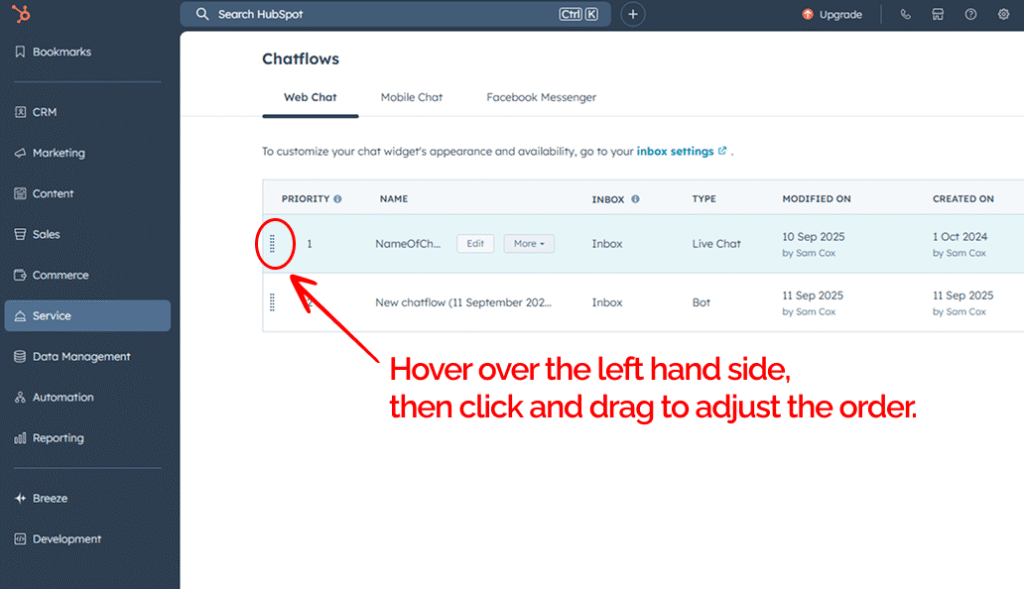
- From your HubSpot Dashboard:
- in the left hand menu, click “Service”
- then click “Chatflows”.

- You will see your existing chatflows. Note the Priority column on the left – the highest chatflow has the highest priority. To change priorities:
- hover over the left-most part of the chatflow you want to move,
- then click and drag the chatflow to your preferred position in the list.
- You will see that the priority column will change to suit the new order of the list.
Your chatflows will now work in your new priority order!