Looking to build a chatbot in HubSpot? This guide covers everything you need to know about the HubSpot chatbot builder in 2026 – including the different chatflow types, step-by-step setup instructions, plan limitations, and a smarter alternative if you’re on a Free or Starter plan.
Contents:
- What is the HubSpot Chatbot Builder
- The 3 Types of HubSpot Chatflows
- HubSpot Chatflow Comparison Table
- How to Create a Chatbot in Hubspot (step by step)
- Additional Setup Details & Troubleshooting
- HubSpot Chatbot Builder Limitations
- Workarounds for Free and Starter Plan Users
- A Better Alternative: Add AI to HubSpot Without Upgrading
- How to Add Resolve247 to Your HubSpot Chat
- Which HubSpot Chatbot Option Should You Choose?
- Conclusion: Is the HubSpot Chatbot Builder Worth It?
- FAQ
What is the HubSpot Chatbot Builder?
HubSpot’s chatbot builder is part of their Chatflows feature. It lets you create automated chat widgets for your website to engage visitors, qualify leads, book meetings, and provide customer support.
There are actually three different types of chatflows you can create, and they work very differently. The features you can access depend heavily on which HubSpot plan you’re on.
The 3 Types of HubSpot Chatflows
When you create a new chatflow in HubSpot, you’ll choose between three options:
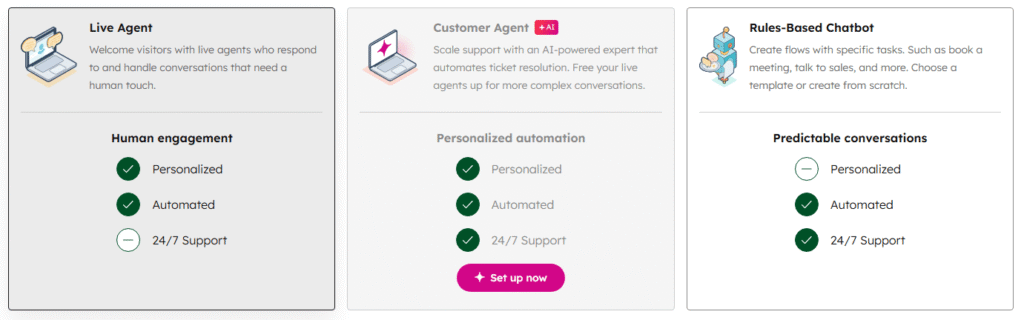
1. Live Agent
What it does: Connects visitors directly with a human team member in real-time (this is also the option you would use to have a third-party AI to respond). This is the simplest option when using the HubSpot Chatbot Builder, but needs either a Human to respond or a third-party AI to respond.
Pros:
- Available on all plans
- Human touch for complex questions
- Can capture email before connecting to an agent
- Simplest to set up for live chat
- Simplest to use with third-party AI integrations
Cons:
- Requires someone to be online (if not using a third-party AI integration)
- Limited data capture (only email) before handover to human
2. Rule-Based Chatbot
What it does: A scripted bot that follows a decision tree you create. It asks predefined questions and routes visitors based on their answers. Using the Chatbot Builder you’ll manually create each step in the conversation flow.
Pros:
- Available on all plans (but many features locked)
- Can ask questions to collect data such as name, company size, etc
- Includes if/then branches to route customers to different questions
- Predictable responses (fully scripted)
- Good for simple, repetitive queries
Cons:
- Limited to the exact paths you predefine
- Feels robotic to visitors, can be frustrating
- Many features locked on lower plans (see limitations below)
3. Customer Agent (Breeze AI)
What it does: An AI-powered agent that uses your knowledge base content to answer customer questions automatically. HubSpot’s Chatbot Builder will help you train the Breeze AI on your knowledge so that it can answer questions about your company.
Pros:
- Understands natural language
- Pulls answers from your knowledge base
- Works around the clock
Cons:
- Only available on Professional and Enterprise plans
- Costs credits per conversation (equivalent to ~$1 per conversation). For a full breakdown, see our article on Hubspot AI Agent Pricing.
- Requires a knowledge base to function well
- May hallucinate or give incorrect answers
HubSpot Chatflow Comparison Table
| Feature | Live Chat | Rule-Based Bot | Customer Agent (Breeze) |
|---|---|---|---|
| Availability | All plans | All plans (limited) | Professional+ only |
| Costs | Included | Included | HubSpot Credits |
| Setup complexity | Low | Medium | Medium |
| 24/7 coverage | No (needs staff) | Possible | Yes |
| Natural language | N/A (human) | No | Yes |
| Answer accuracy | Depends on staff | 100% (fully scripted) | Variable (may hallucinate) |
| Scalability | Low | Medium | High |
| Routing, enrollment, if/then branches | N/A | Pro+ only | N/A |
| Knowledge base search | N/A | Pro+ only | Yes |
How to Create a Chatbot in HubSpot (Step-by-Step)
The following section will walk you through the choices, and will include detailed steps for each different chatflow in the HubSpot Chatbot Builder.
Whichever type of chatbot you choose to use, here’s the step-by-step process to set up a chatbot in HubSpot. If this is your first time setup, simply scroll down to keep reading. But if you want to skip ahead, here are links to the main sections:
- First time set up of your chat widget
- Choose your workspace, channel and chatflow type
- Configure your chosen chatflow type:
Step 0: First time chat widget setup
If this is the first time you are creating a chat widget, then you might see the “Let’s set up your chat widget” pop up.
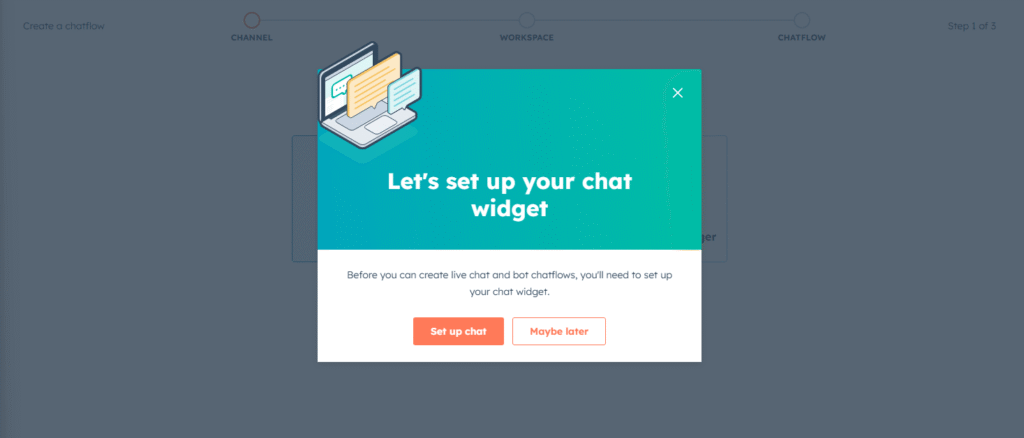
Here, I would suggest picking “Maybe later“.
If you click “Set up chat” you will be taken to the options to set up your chat widget (colours etc) and some other settings that will become irrelevant when you proceed to setup your actual chatflow. If you pick “Maybe later“, you can create your chatflow and then afterwards choose your colour scheme, but without wasting your time on settings that don’t suit your chatflow.
If you click “Maybe later” please skip to the next step.
If you click “Set up chat”, you can follow these steps.
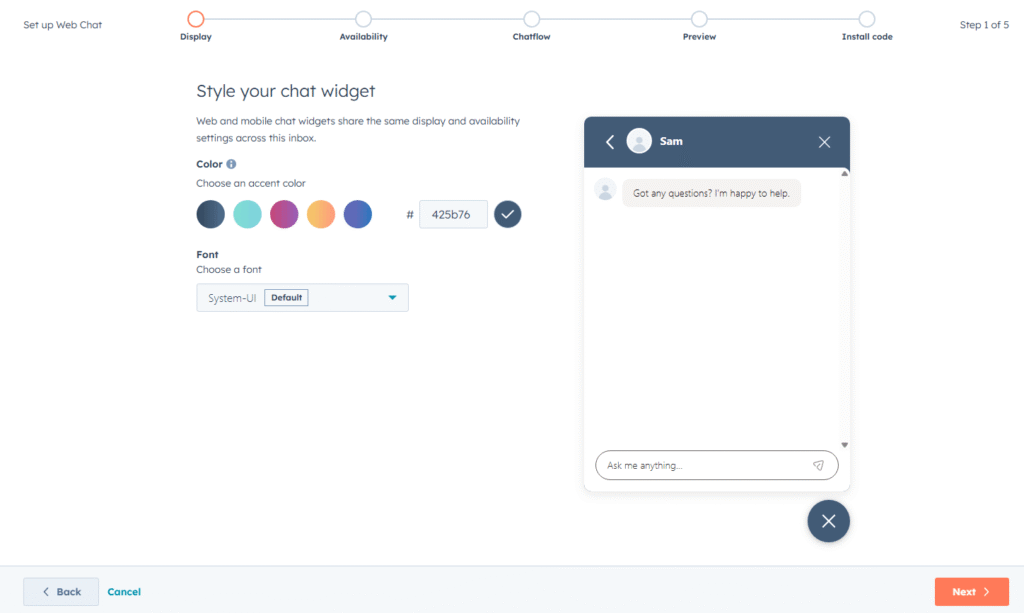
Style your chat widget
Here you can pick the pick colour scheme and font for your chat widget. Click Next once you are happy.
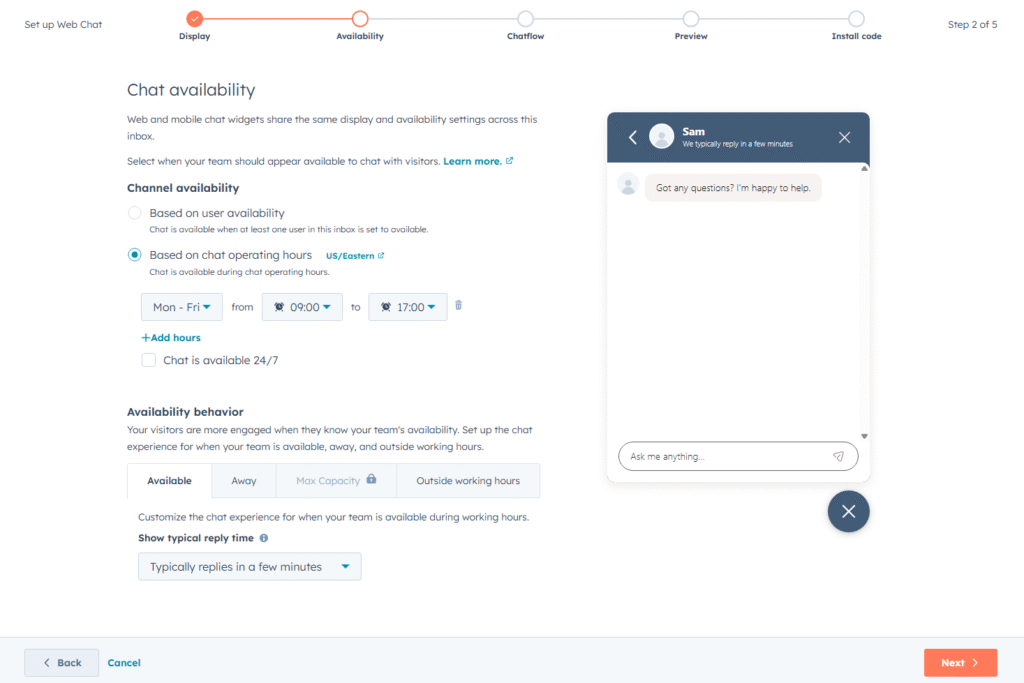
Set availability
This tab will determine when your chat widget will appear. If you are going to use automation in some way, then choosing “Chat is available 24/7” is probably the right choice, but feel free to set operating hours if that suit you. Outside of these hours the chat widget will be hidden.
Under “Availability Behaviour” you can choose what message to show as a subheading underneath the display name. This helps communicate to your customers how long they can expect to wait for a responses.
Choose your first web chatflow
What you select here is likely going to become irrelevant when you setup your actual chatflow in the later steps. The settings you choose here will automatically create a Live Chat chatflow for you, but with only some of the settings available. So regardless of your situation, you can just click Next as we will address the full range of settings properly to suit your preferred chatflow.
If you do want to define settings here, you can choose who incoming messages will go to and who outgoing messages will appear to be sent from (ie from the company, or from a specific person). This is just to get started, so if you are going to be using an AI or rule based option, just select something here to get started, then in the later steps you can change this to suit your automated workflow. Don’t worry about this step, the settings become clear later on.
Preview your widget
Here you can see how your new chat widget will look here, click Next to carry on.
Tracking code
This page will ask you to Install the HubSpot tracking code. This is how HubSpot will show their chat widget on your site (as well as how the rest of the HubSpot features work). If you haven’t added this to your site yet, don’t worry, you can skip this step for now (by clicking “Skip for now” in the bottom right). For more information on the HubSpot Tracking code, you can read HubSpot’s article on Installing the HubSpot tracking code.
After clicking “Skip for now” or if you did verify the installation, you will see a confirmation box pop up.
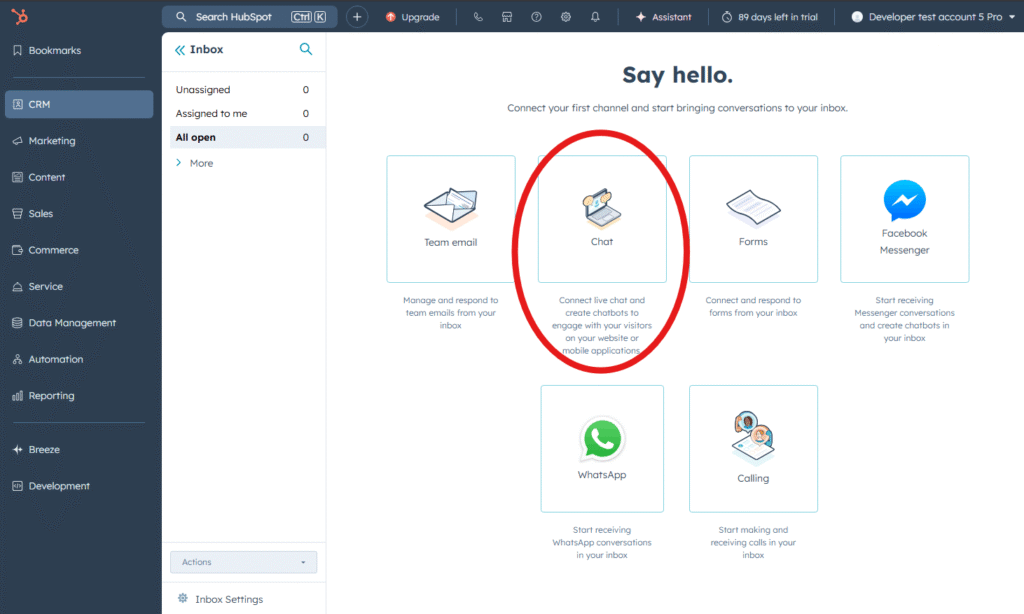
The buttons provided are inconveniently only to take you to your Inbox or to connect another channel, so now we need to get back to the chatbot builder to setup your chatflow properly. So like you did before, go to “Service” -> “Chatflows” in the sidebar.
You will notice that the setup process will have setup a Live Chat chatflow for you, this however has skipped some steps and made some assumptions for you (some of which are encouraging you to start using paid features while you are in a trial period!). For example the auto-created chatflow might default to “Help desk” inbox which is an upgrade feature, whereas you might be perfectly fine using the “Inbox” inbox (confusingly worded…). So this guide will start from scratch so you can see what is available to you.
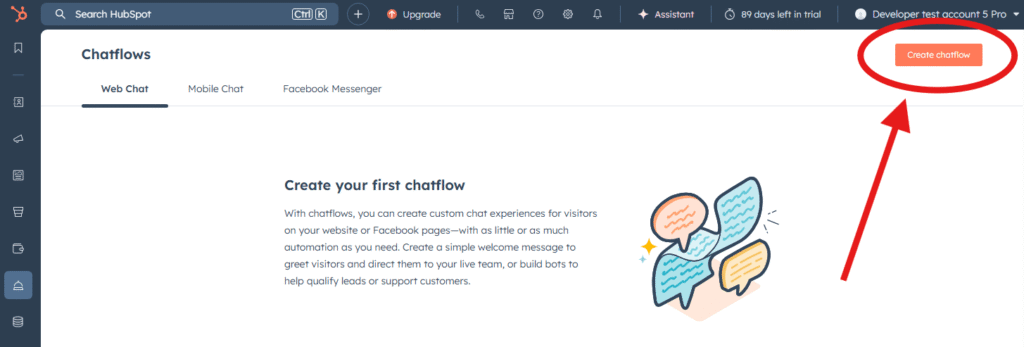
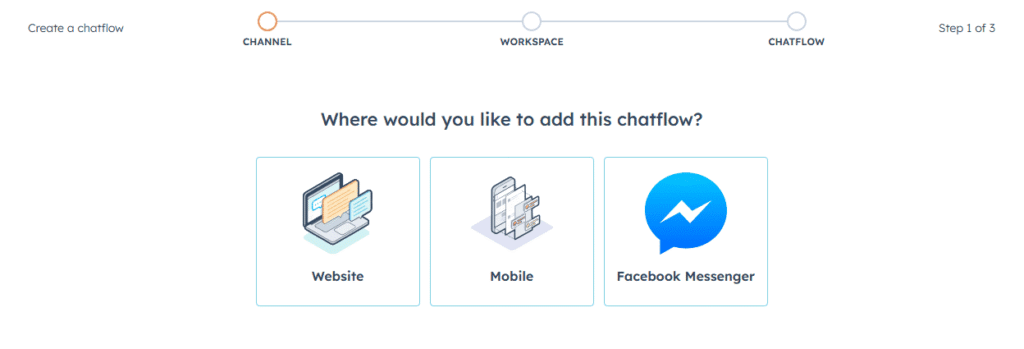
Step 1: Navigate to Chatflows
- Go to Service → Chatflows (or Conversations → Chatflows in older interfaces)
- Click Create chatflow in the upper right
Step 2: Select Website
Choose Website to create a chatbot for your website. (The other options have limited functionality.)
Step 3: Choose Your Workspace
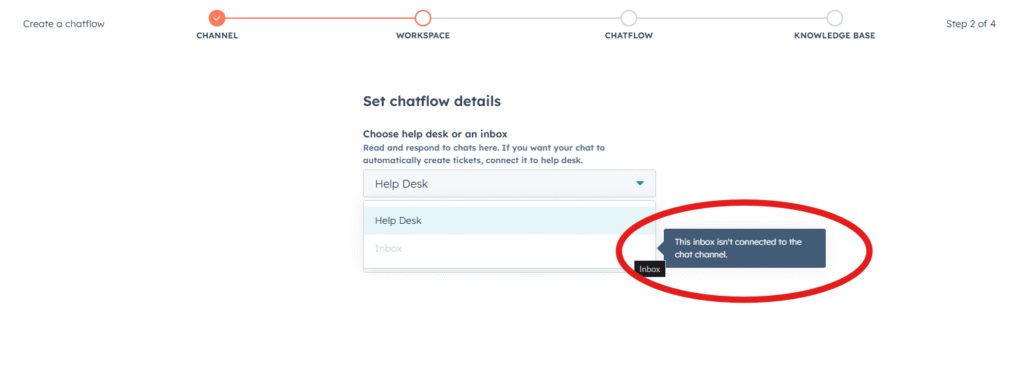
Select an inbox or help desk from the dropdown.
- Note that selecting a “Help Desk” option means that only Users with an appropriate Seat can send messages from that mailbox, whereas using an “Inbox” means that other Users (without a service seat) can send messages from that mailbox.
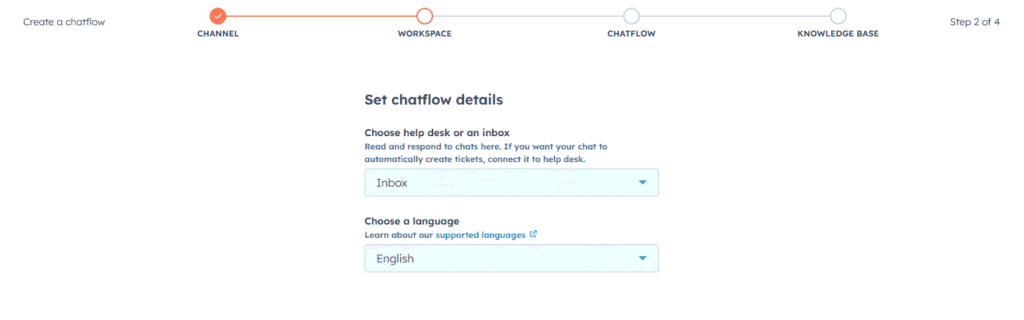
If you want to select Inbox, but its not available, you might see “This inbox isn’t connect to the chat channel“. To fix this, see How to connect Inbox to Chat Channel, then come back here once connected.

Choose your chatflow language (default is English). Then Click Next to move on.
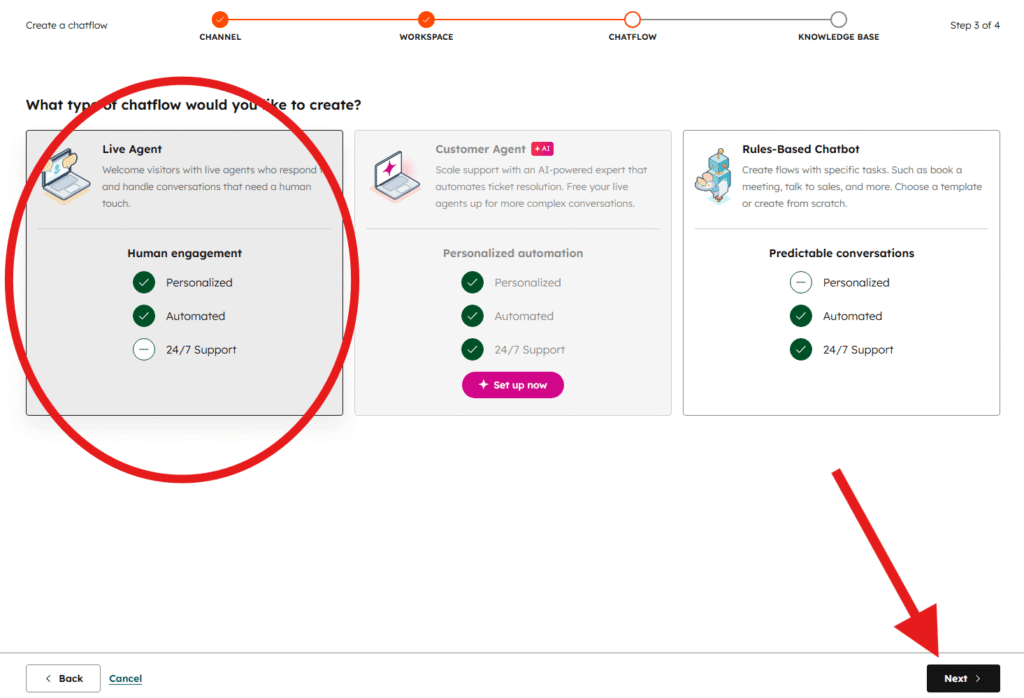
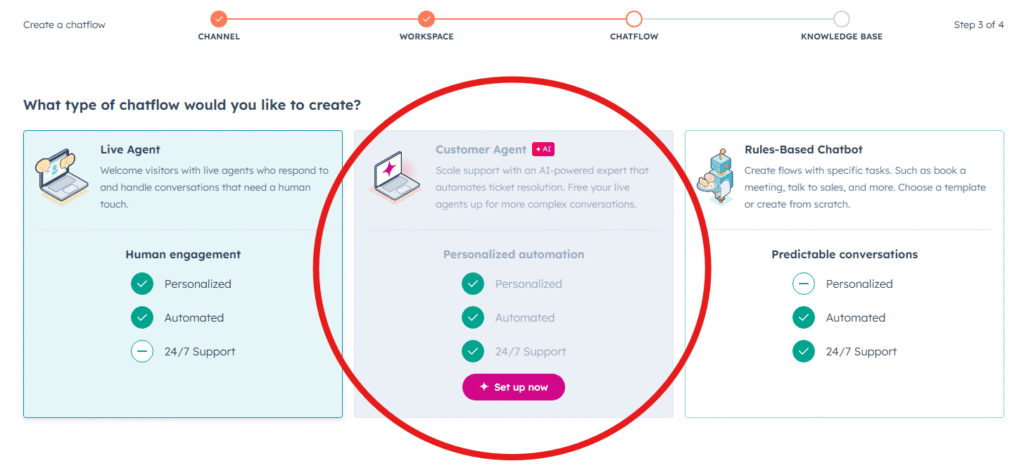
Step 4: Choose your Chatflow Type
This is where you decide which type of chatflow to use.
Depending on which option you choose, your next steps change, so please skip to the section that is relevant to the chatflow you have chosen.
If you choose Live Agent, skip to the Setting up Live Agent section (just below).
If you choose Rule-Based Chatbot, skip to the Setup Rule-based Chatflow section.
If you choose Customer Agent, skip to the Setting up Customer Agent section.
Setup Live Agent Chatflow
(Note that some parts of the Live Agent chatflow setup are the same as the Rule-based chatflow setup, but for convenience we have repeated all steps in both sections)
After selecting Live Agent Chatflow, click “Next” in the bottom right corner, then we can get started!
The below steps include the important details to get you going quickly, but without skipping crucial decisions. If you would like more information you can refer to HubSpot’s own documentation on Creating a Live Chat.
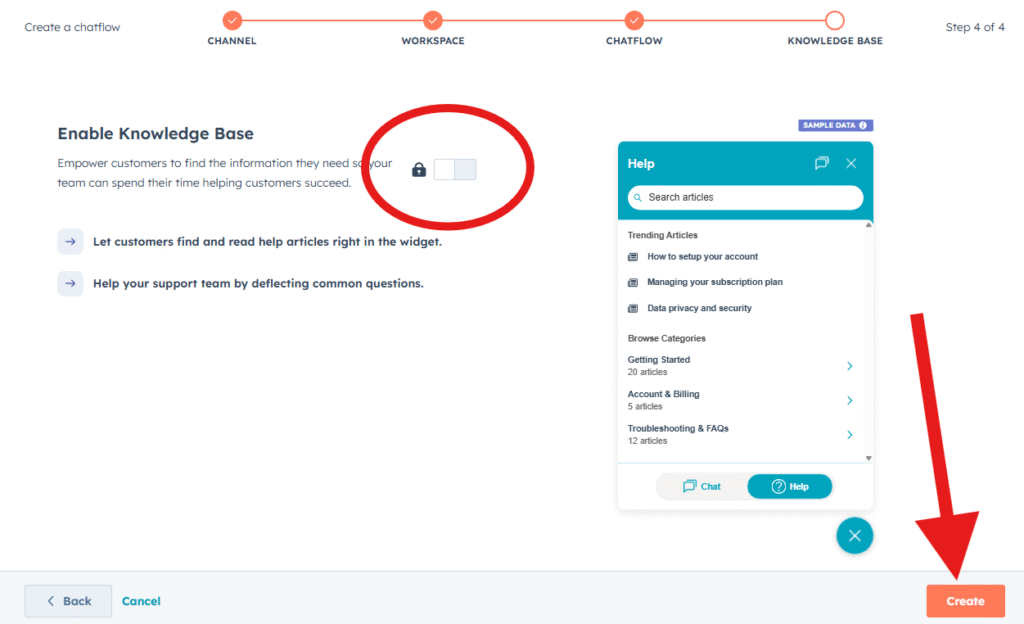
Optional: Enable Knowledge Base
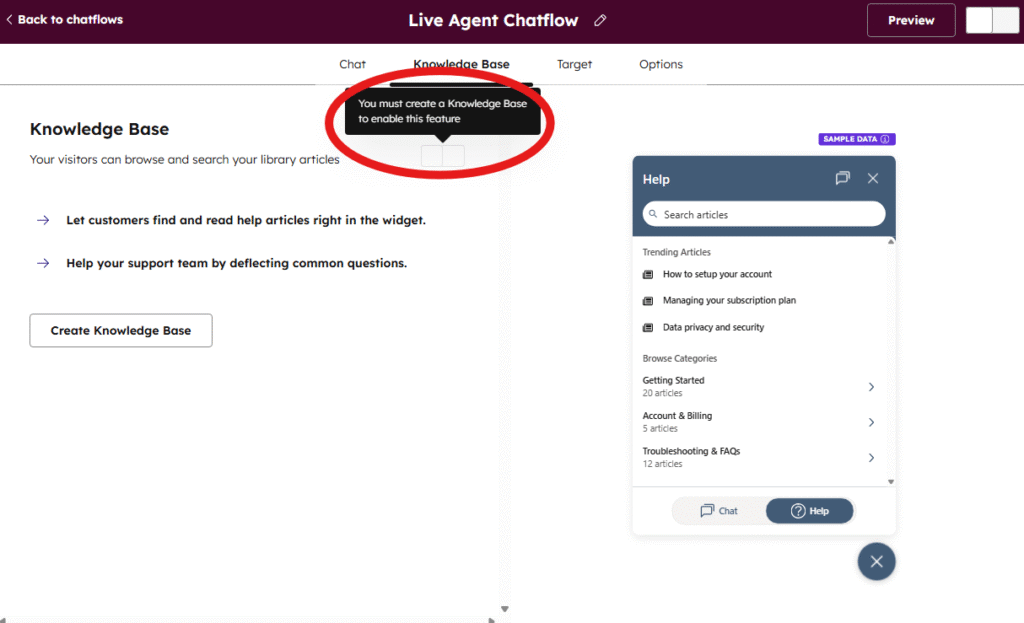
The next page you see will be for the optional Knowledge Base feature.
If you have a Professional or Enterprise subscription of the Service Hub, then you can enable this which allows searching documentation within the chat widget. If you are on the free or starter plans, or don’t have the Service Hub, then this option will be locked.
(If you would like the convenience of suggesting knowledge base documents within the chat widget using normal conversation, third-party integrations are available for this, which we will cover later on in this article)
This screen is a little confusing, but you can proceed with or without the Knowledge Base feature by clicking “Create” in the bottom right (which will create your chatflow, not create a knowledge base…).
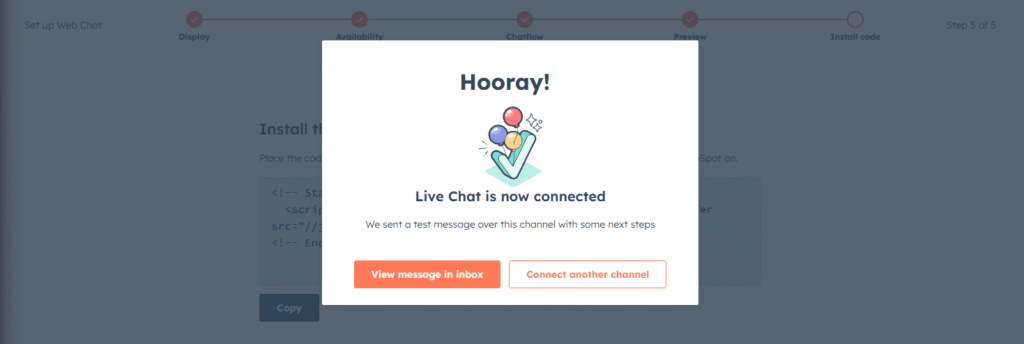
Your Chatflow now exists!
After clicking “Create” your Chatflow now exists! If you leave the page at any point you will still see your new Chatflow listed on your settings page.
But it needs customising to suit your requirements.
Next, within the Live Agent Chatflow, you’ll see some tabs to work through configuring the options for your chatflow. Start on the “Chat” tab (shown on the top of the window).
Optional step: Assignment
If you are on a Service Hub higher tier plan, you will see the option for “Assignment”. This is where you can choose to assign incoming messages to a member of your team.
This option will not be shown if you are not on the right HubSpot plan.
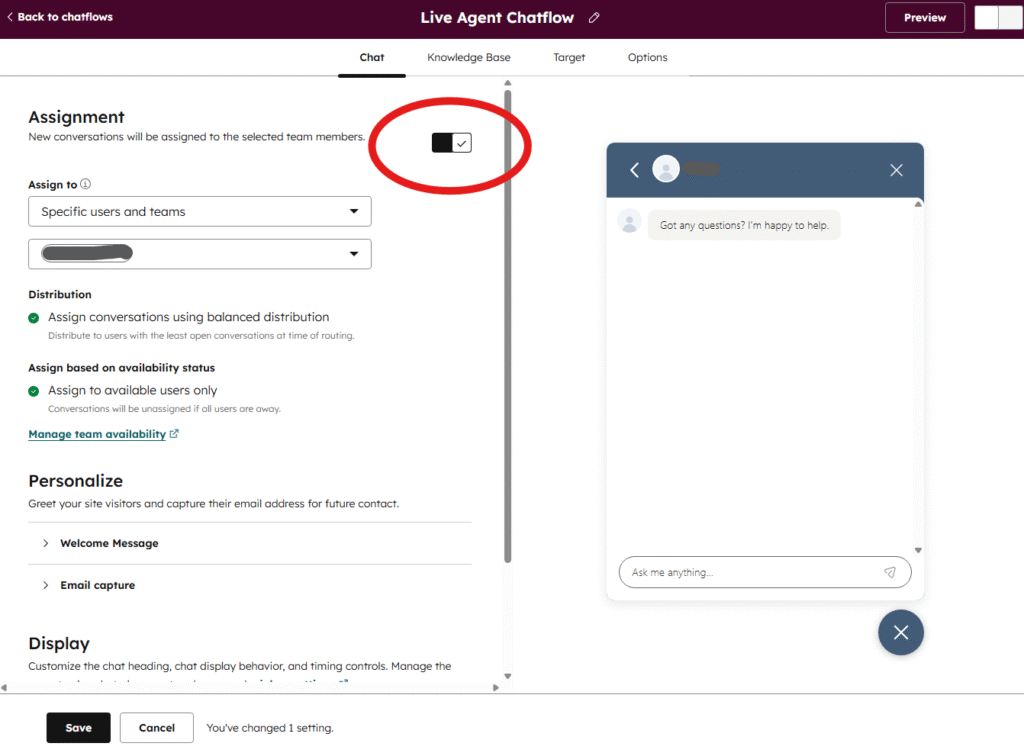
Step 5: Personalize your Live Agent
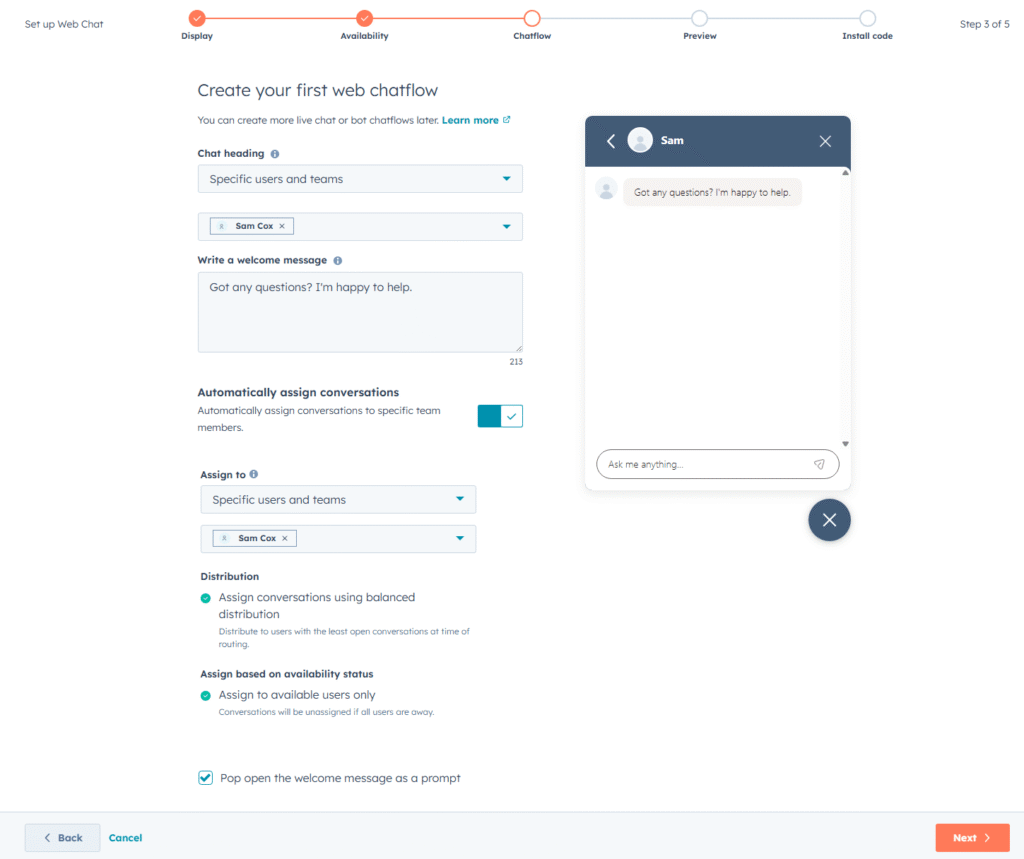
- Under Personalize you will see “Welcome Message” and “Email Capture” options.
- The “Welcome Message” is the fixed message that appears as soon as someone opens the chat widget. Here it might be a good idea to let your Customer know what to expect, such as is there a human on the other end of the chat, is this 24/7 chat, is there an AI agent waiting to help, etc.
- The “Email Capture” settings let you choose if you want to ask a customer for their email address:
- immediately after their first message,
- only if no team member replies after 1 minute,
- never ask for their email address.
- and what message you want to include, such as “You can leave your email if you don’t want to wait, and we’ll get back to you.“
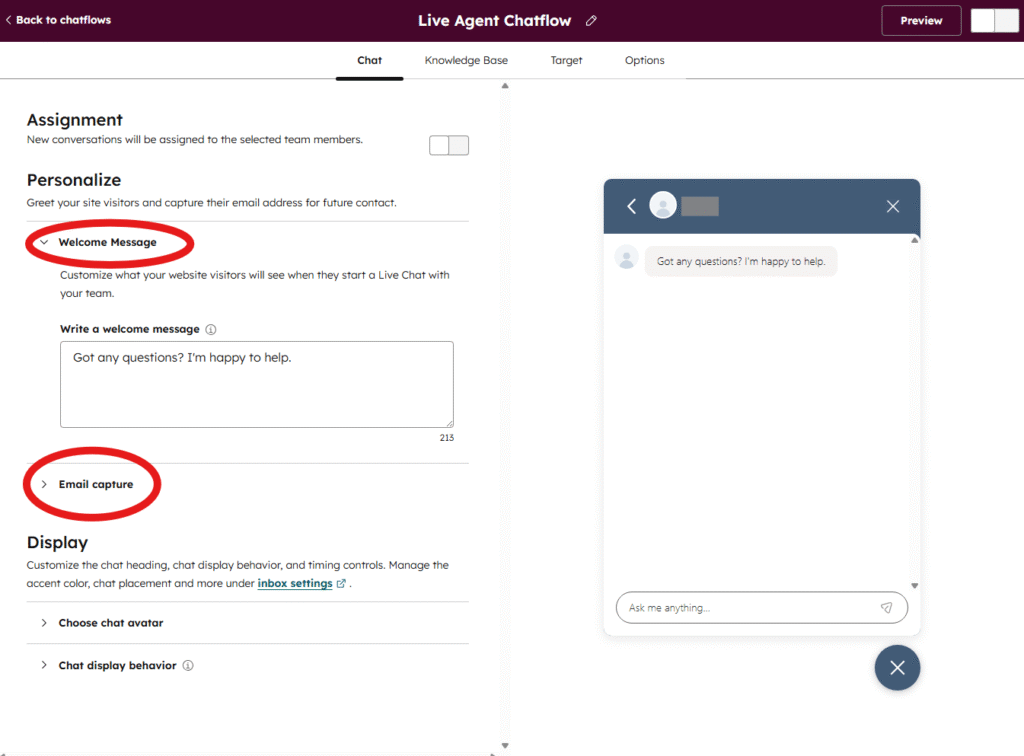
Step 6: Configure Display Settings
- On the same “Chat” tab, scroll down to “Display” where you will see the options for your avatar and widget behaviour.
- Note that the “Display” section is not where you choose your colour scheme… That is elsewhere. We have covered the steps to change the colour scheme later in this article under Change Appearance of your HubSpot Chat Widget later on in this article (so keep scrolling for now).
- Under “Choose chat avatar” you can choose “who” you want the widget to look like. You can set it to:
- use Custom Branding (to use your Company logo, and a custom name),
- use a single user, to match their profile photo and their display name,
- select multiple users, to show multiple user photos and multiple display names.
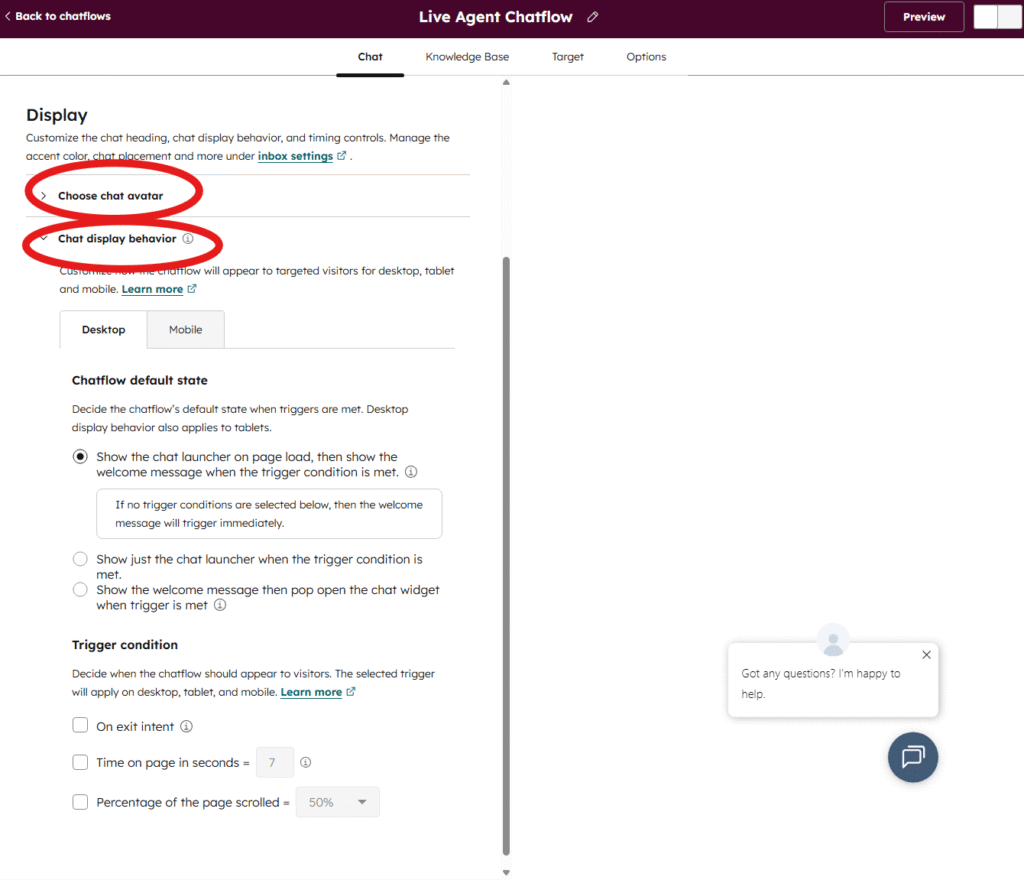
- Under “Chat display behavior” you can set triggers to choose:
- when you want the chat icon to appear (on page load, or only under certain conditions),
- when you want a welcome message to pop up (after X seconds on the page),
- when you want the chat widget to automatically open (on exit intent, on page scroll, after X seconds on page).
Optional step: Enable Knowledge Base search (again…)
Now we’ll move along to the “Knowledge Base” tab, which is a repeat of the same screen you saw earlier.
We won’t repeat everything, but in short:
- If you are on an appropriate HubSpot plan, you will be able to enable the Knowledge Base feature.
- You will need to already have a HubSpot Knowledge Base set up.
Feel free to just move on to the “Target” tab.
Step 7: Choose Chatflow Target
Next, we are on the “Target” tab.
This is the page that decides where your chatflow will appear. You can choose which website pages you want your chatflow to appear on, and also optionally set visitor conditions (such as only-show-widget-if-user-is-logged-in etc).
If you have one chatflow, and you want your chat widget to appear on all your pages, regardless of who is viewing the page, then you can simply leave the default setting of “Website URL” – “is all pages” and move on to the Options tab.
Be sure to consider that one User will likely fall into multiple conditions so please choose your show/hide conditions carefully.
For more information on setting up these conditions, see our section on How to set Chatflow Target Conditions, and then come back here when you’re ready to continue (there’s a link to make it easy to get back here).
Once set, you can move on to the Options tab.
Step 8: Options tab
This tab has “the rest of the settings”. Bits and bobs that don’t belong on any other page.
The options that appear on this page will vary depending on your plan. Here you’ve got:
- Language – what language to display the widget in.
- Data privacy & Consent – when to show the cookie request and data processing request, and the message to show.
- Marketing contacts – whether to include visitors in your marketing activities.
- Feedback – whether to ask visitors to complete a survey for feedback.
- Security & spam protection – This enables Visitor Verification which is intended to prevent bots or suspicious activity from interacting with your chat widget.
Step 9: Preview & Enable
In the top right of any of these tabs, you can see a “Preview” button and the slider to enable/disable this chatflow.

If you click “Preview” you’ll see a sidebar window where you can try out your HubSpot chat widget using your current settings.
If you are happy with everything, click the slider in the top right to enable this chatflow and your chat widget should now appear on your website, with these latest settings.
Chat Widget not appearing? Or Wrong chatflow appearing? This could be for several reasons, you might not yet have the HubSpot tracking code installed, or maybe you have multiple chatflows interfering with each other - we have an article that will help you to fix HubSpot widget problems.
Having a Live chat widget is great to talk to your customers, but there is also the expectation that you can respond 24/7, which adds to your workload! If you want any help answering questions accurately and reliably, there are high quality AI Chatbots available to easily plug straight into your new HubSpot Chatflow (and they are 96% cheaper than HubSpot’s AI solution!).
You can read more about the better alternative later in this article.
Setup Rule-based Chatflow
(Note that parts of the Rule-based chatflow process is the same as the Live Agent chatflow process, sometimes in a different order, but for convenience we have repeated all steps in both sections)
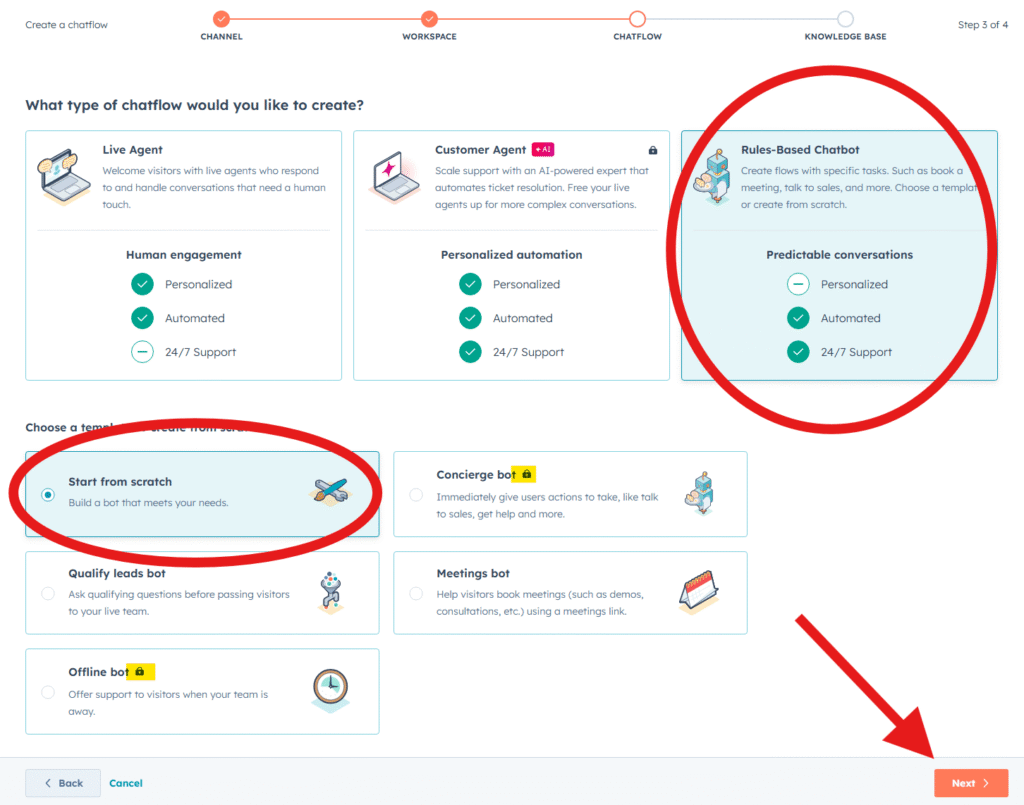
Having selected Rule-based chatflow, you will first be asked to choose from a template to get you started.
The below steps are condensed to get you going quickly, with the important information. If you would like to know more details about every detail, you can go refer to HubSpot’s documentation on Creating a rule-based chatbot.
Step 5: Pick a Template
HubSpot offers several bot templates to give you an idea of what is possible:
| Template | Description | Plan Required |
|---|---|---|
| Start from Scratch | Build your own custom flow | Free |
| Qualify Leads Bot | Gathers visitor information and intent | Free |
| Meetings Bot | Lets visitors book meetings | Free |
| Tickets Bot | Creates support tickets from chats | Free |
| Concierge Bot | Routes visitors to teams, KB, or meetings | Professional |
| Knowledge Base + Support Bot | Shares KB articles, then offers support | Professional |
| Offline Bot | Handles after-hours with email capture | Professional |
Depending on what option you selected, you will see some different steps specific to your template.
This guide will cover everything as if you are using the Start from Scratch template, so if you use a template some of the below choices may be pre-selected, and you may see other options. Feel free to adjust the template to suit your needs.
Select your template and click “Next“.
Optional: Enable Knowledge Base
Now you’ll see a page for the optional Knowledge Base feature.
If you have a Professional or Enterprise subscription of the Service Hub, then you can enable this which allows searching documentation within the chat widget. If you are on the free or starter plans, or don’t have the Service Hub, then this option will be locked.
(If you would like the convenience of suggesting knowledge base documents within the chat widget using normal conversation, third-party integrations are available for this, which we will cover later on in this article)
This screen is a little confusing, but you can proceed with or without the Knowledge Base feature by clicking “Create” in the bottom right (which will create your chatflow, not create a knowledge base…).
Your Chatflow now exists!
After clicking “Create” your Chatflow now exists! If you leave the page at any point you will still see your new Chatflow listed on your settings page.
But it needs customising to suit your requirements.
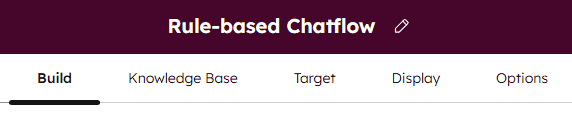
Next, within the Rule-based Chatflow, you’ll see some tabs to work through configuring the options for your chatflow. Start on the “Build” tab (shown on the top of the window).
Step 6: Build your conversation flow
Before starting to build, you’ll need to know what you want to happen in your conversation. So you’ll need to know what options are available to you first!
What options are there in a rule-based chatlow?
The options available in the rule-based chatflow vary depending on your subscription. If you want to read more about the limitations of each plan for all types of chatflow, see the section on Hubspot Chatbot Limitations later in this article. Below is a breakdown of the options available in the rule-based HubSpot Chatbot Builder for each plan:
| Bot Action | Free / Starter | Professional + |
|---|---|---|
| Send simple message | ✅ | ✅ |
| Ask a question | ✅ | ✅ |
| If/then branch | ❌ | Service Hub Pro |
| Send to team member | ✅ | ✅ |
| Send to Customer Agent | ❌ | Uses HubSpot Credits |
| Set contact property | ✅ | ✅ |
| Set company property | ✅ | ✅ |
| Add to static segment | ✅ | ✅ |
| Knowledge Base lookup | ❌ | Service Hub Pro |
| Offer email subscription | ✅ | ✅ |
| Book a meeting | ✅ | ✅ |
| Enroll in workflow | ❌ | ✅ |
| Trigger a webhook | ❌ | Data Hub Pro |
| Run a code snippet | ❌ | Data Hub Pro |
Bot actions explained
Here we will briefly describe each bot action that is available in the rule-based chatflow builder. If you would like to see how to add actions, or examples of completed chatflows, please skip ahead to the next section.
Building Blocks Actions:
- Send simple message – Send text to the customer, this could be for a welcome message, could be part way through the conversation flow, or could be used to end the conversation.
- Ask question – There are preset questions like Name, Email, Address etc, but you can also set a Custom question so you can ask whatever you want. You can allow free text response, or force only selecting from your predefined answers, depending on your question. You can also choose whether to save the response to a HubSpot property in your CRM. Note that although you are asking a question, the flow will proceed regardless of the answer; if you want a different next-step based on their response then you need to use the “If/then branch” below.
- If/then branch – If you are on the Service Professional/Enterprise plan you can have the chatflow proceed differently depending on the visitor’s responses, existing contact property, or agent availability. So as an example, you could use this to only pass a customer to a live agent if they are a paying customer of yours. Or you could ask them what their question is about, and use this to direct the visitor to the appropriate team member.
Conversations Actions:
- Send to team member – This lets you pass the conversation from the rule-based chatflow to a User, so that they can continue the conversation. The User must have a Service Seat to be assigned the conversation. For example after using some “Ask question” blocks above, you could then send the conversation to a team member so they can handle the conversation. Note that if you only want to collect email, you can also do this within the Live Agent chatflow.
- Send to Customer Agent – This lets you pass the conversation to HubSpot’s AI Customer Agent, which requires you to be on a Professional/Enterprise plan and will use HubSpot Credits at a cost of $1/conversation. If you are looking to integrate alternative AI chatbots into your HubSpot widget, instead of using this option, you can instead use either the “Send to team member” option or use a Live Agent chatflow instead (and the AI will be responding instead of a human). We cover more on the problems with Breeze later in this article.
CRM Actions:
- Set contact property value – This option is probably most useful in combination with an “If/then branch” (to store info as a contact property) but can be used to store any additonal contact property that you need (but based on fixed data. To store a property based on an answer, use the “ask a question” option). For example this could be used in combination with different chatflows (so you could store “used Chatflow X” as a contact property if you wish).
- Set company property value – same as “contact property value” but storing as a Company property instead of a contact property.
- Add to static segment – a static segment is similar to a “list”. So you can add this contact to one of your existing Static Segments if you are using that feature. This could be used as a follow up list for example “used chatflow, follow up needed” to check in with the customer after they asked a question.
Service Actions:
- Knowledge Base lookup – only available to Service Hub Professional. This lets you either present particular knowledge base articles to the visitor, or give them a search box so they can search for documentation within the chat widget. So if your if/then branch gave them the option to ask about “reset password” you could show them the article on “How to reset your password”.
Subscriptions Actions:
- Offer email subscription – give the customer the option to join one of your email Subscriptions, as exists in your Marketing -> Email -> Subscription Types page. Using email subscription types is included in Marketing Hub Starter and above, or Content Hub Professional and above.
Sales Actions:
- Book a meeting – here you can share a link for the customer to book a meeting, and define the message you want to show if the customer completes the booking.
Automation Actions:
- Enroll in workflow – requires a Professional subscription. Using this you can enter the contact into a HubSpot workflow, so long as the visitor already has a contact record (which can be created earlier in the flow by saving name/email etc).
- Trigger a webhook – requires Data Hub Professional. You can send information or trigger an action with an external source using this option. For example if your business has an existing server that can handle webhooks, you can use this to trigger an action on your server or to send information to your server.
- Run a code snippet – requires Data Hub Professional. This will let you run custom code within the chatbot. For example you could display live data received from your webpage or you could trigger an action on your webpage (a pop up or page change etc); so using this option is very flexible.
How to use actions in the rule-based chatbot builder
So you know your options, and you know how you want your conversation to flow; so how do you put it all together?
If you’d like to skip all this hassle building a chatflow, consider using a conversational AIChatbot that will let the conversation move in any direction about your business. So you don’t have to predict what the customer might ask, and still have confidence that the AI will only talk about your business accurately and appropriately. If you would like to know more you can skip ahead to our section on a better way to handle real conversations, still working within HubSpot CRM, and even providing premium features but on the free HubSpot plans!
Whether you started with a template, or from scratch, there will be some actions on the screen to get you started. You can edit or delete these existing actions, and add new actions to suit the conversation flow you need.
The below image shows the start-from-scratch situation, where you can start building your chatflow:
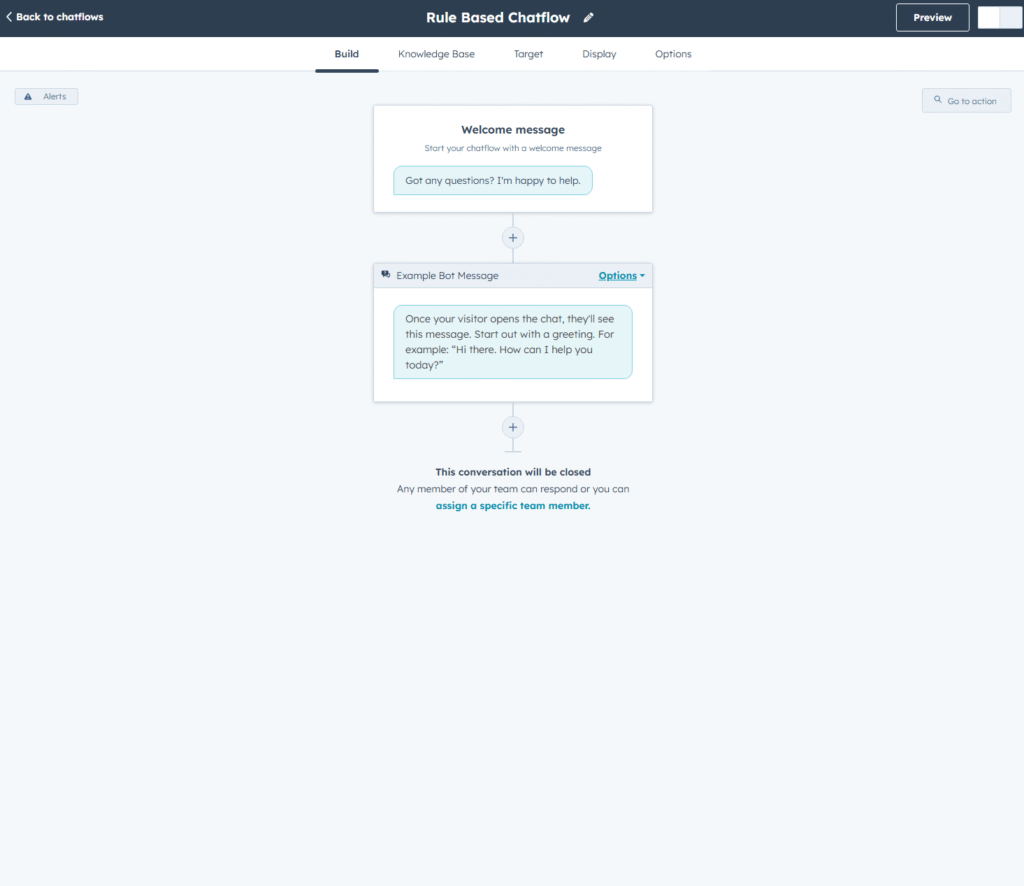
To add a new action into your rule based chatflow
Find where you would like to add a new action, look for the Plus Icon and click it. You will see the sidebar open where you can select which new action (from the list explained above) you would like to add.
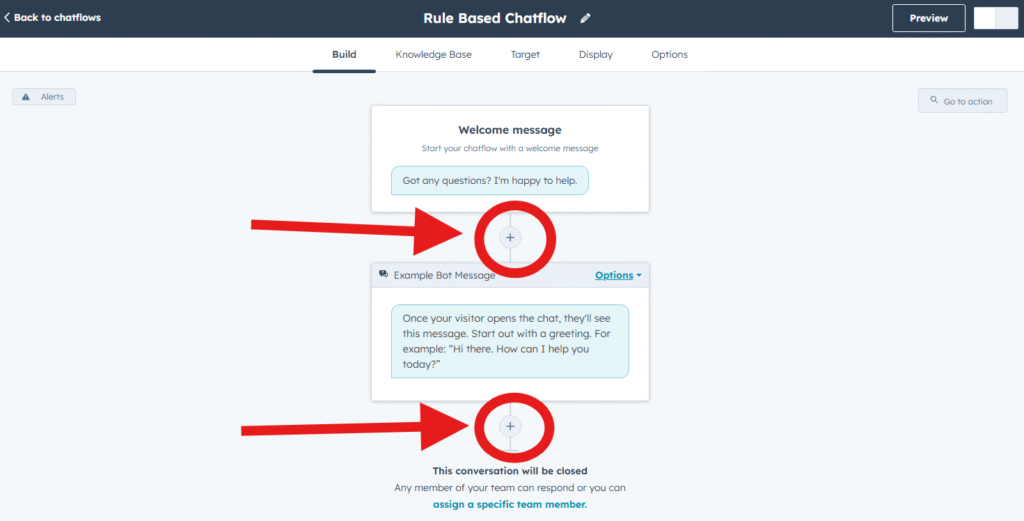
Select the action you would like to add from the list, edit its settings, and click Save.
Then you will see the new action appear in the visual chatflow builder.
To delete an action from your rule based chatflow
In the top right of the action block you want to delete, click “Options“, then click “Delete action“.
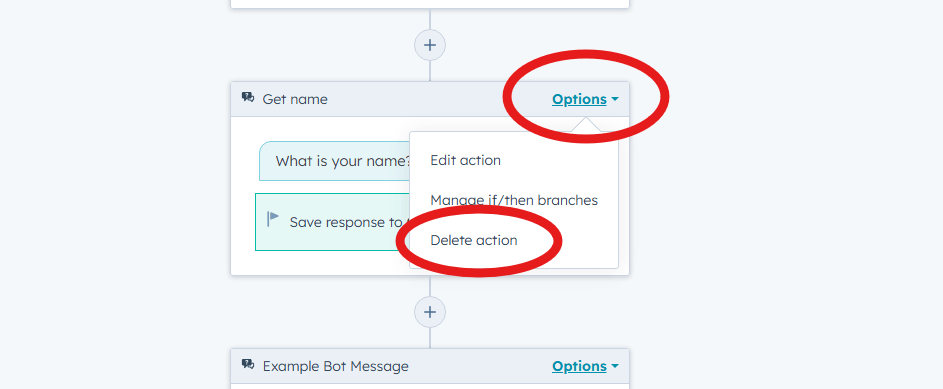
The action you chose to delete will now be removed, and the remaining action below will move upwards to take its place.
To edit an action in your rule based chatflow
Once an action has been created, you can go back and edit it as many times as you need to. Simply click the action card you would like to edit, and the sidebar menu will appear, showing the settings that are available for you to edit.
You can also click “Options” then “Edit action” to open the sidebar.
Optional step: Enable Knowledge Base search (again…)
Now we’ll move along to the “Knowledge Base” tab, which is a repeat of the same screen you saw earlier.
We won’t repeat everything, but in short:
- If you are on an appropriate HubSpot plan, you will be able to enable the Knowledge Base feature.
- You will need to already have a HubSpot Knowledge Base set up.
Feel free to just move on to the “Target” tab.
Step 7: Choose Chatflow Target
Next, we are on the “Target” tab.
On this page you decide where your chatflow will appear, by setting conditions. Provide the website URLs you want your chatflow to appear on, and also optionally set visitor conditions (such as only-show-widget-if-user-is-logged-in etc).
If you have one chatflow, and just want that chatflow to show on all your pages, you can simply leave the default setting of “Website URL” – “is all pages” and move on to the Display tab.
If you would like detailed instructions on how to set conditions on this page, please read the section below on How to set Chatflow Target Conditions.
You can provide conditions to “show” and conditions to “hide” the chatflow by either URL or visitor information. Make sure to consider that one User will likely fall into multiple conditions so please choose your show/hide conditions carefully.
Once set, you can move on to the Display tab.
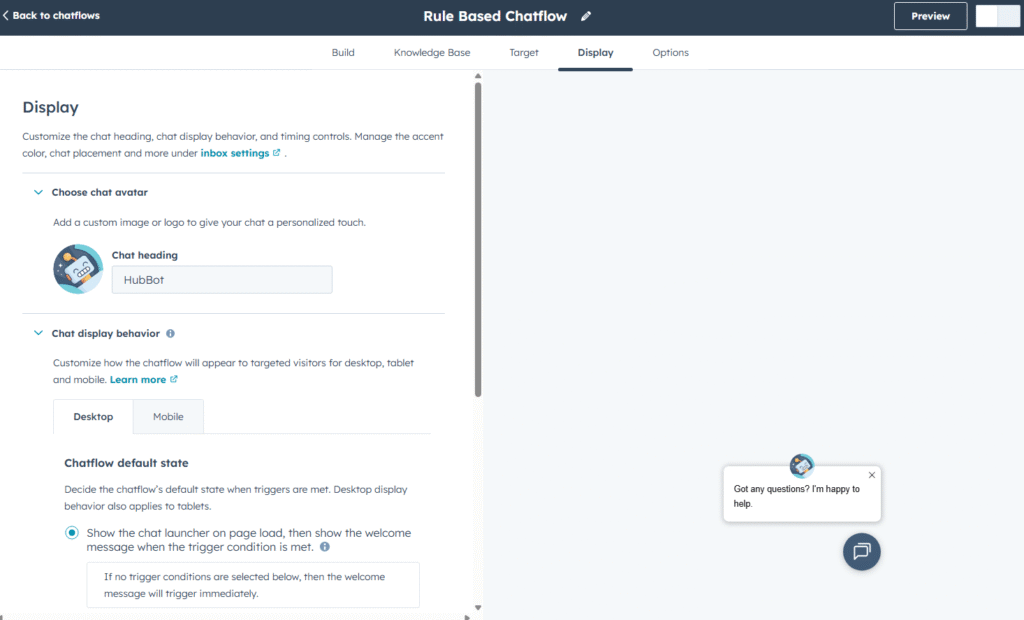
Step 8: Configure Display Settings
- On the “Display” tab, you’ll see the options for your avatar and widget behaviour.
- Note that the “Display” section is not where you choose your colour scheme… That is elsewhere. We have covered the steps to change the colour scheme later in this article under Change Appearance of your HubSpot Chat Widget later on in this article (so keep scrolling for now).
- Under “Choose chat avatar” you can choose the Avatar image and Heading text you want to show.
- Under “Chat display behavior” you can set triggers to choose:
- when you want the chat icon to appear (on page load, or only under certain conditions),
- when you want a welcome message to pop up (after X seconds on the page),
- when you want the chat widget to automatically open (on exit intent, on page scroll, after X seconds on page).
Step 9: Options tab
On this page you can select numerous other settings grouped together – there’s a lot to take in on this page, so skim through to get an idea of what’s available here in case you have a strong preference, but the defaults are likely to be fine to start with. Then after some testing you can always come back and adjust these later.
The options that appear on this page will vary depending on your plan. You will be able to choose from:
- Typing delay – to make the automatic responses feel more human, you can add a delay.
- Session timeout – use this to reset a conversation after a period of time.
- Error message – if something goes wrong, what message would you like to show.
- Language – what langaude to display the widget in.
- Availability – choose what day/time this chatflow is available; also dependent on the availability of the users you have assigned to the Inbox.
- Data privacy & Consent – when to show the cookie request and data processing request, and the message to show.
- Marketing contacts – whether to include visitors in your marketing activities.
- Feedback – whether to ask visitors to complete a survey for feedback.
- Security & spam protection – This enables Visitor Verification which is inteded to prevent bots or suspicious activity from interacting with your chat widget.
Step 10: Preview & Enable
In the top right of any of these tabs, you can see a “Preview” button and the slider to enable/disable this chatflow.

If you click “Preview” you’ll see a sidebar window where you can try out your HubSpot chat widget using your current settings.
If you are happy with everything, click the slider in the top right to enable this chatflow and your chat widget should now appear on your website, with these latest settings.
Chat Widget not appearing? Or Wrong chatflow appearing? This could be for several reasons, you might not yet have the HubSpot tracking code installed, or maybe you have multiple chatflows interfering with each other - we have an article that will help you to fix HubSpot widget problems.
Setup HubSpot Customer Agent
After clicking on “Customer Agent” on the chatflow screen, you will be redirected depending on your plan.
The below steps show the important steps and crucial decisions you need to make, helping you get started quickly but without skipping over anything important. If you would like to see the full instructions you can refer to HubSpot’s documentation on Setting up Customer Agent.
If you are on Free or Starter plans:
The Free and Starter plans don’t have access to Customer Agent, so you will see a screen asking you to start a trial, or talk to sales, or upgrade your plan etc. This is an expensive upgrade just to get access to Customer Agent – fortunately there is another way to get AI in your hubspot chat widget! Even if you were on a higher plan, using Customer Agent costs $1/conversation (by consuming HubSpot Credits), so it is an expensive add on feature. Skip ahead to where we run through the better alternative, so you can easily add AI to your site.
If you are on Professional or Enterprise plans:
Clicking “set up now” will divert you to the Customer Agent section, also accessible from “service” -> “Customer Agent”.
Before setting this up, we should very quickly highlight the costs. Each conversation costs 100 HubSpot credits, equivalent to $1/conversation. If you are aware of this and still want to proceed with HubSpot’s Customer Agent, then click “Set up your agent” to proceed.
If you would like to save 96% on your AI costs and maintain high quality (reducing your support tickets by 82%), see our section below on the better alternative.
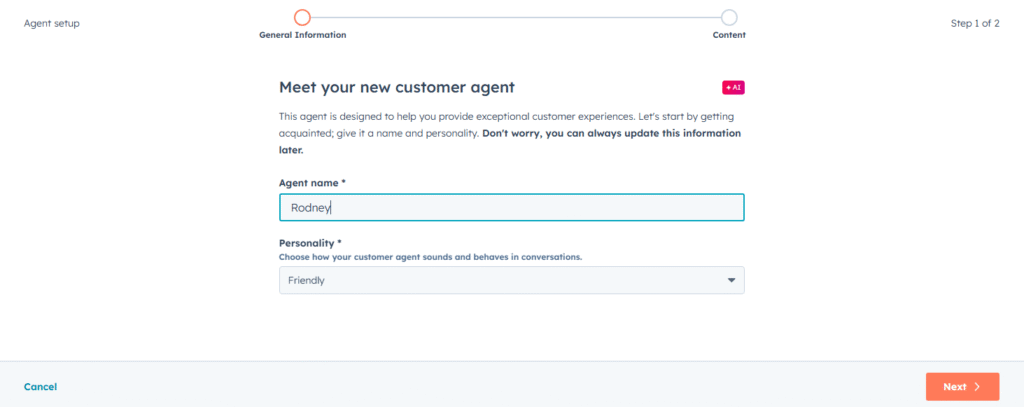
Step 5: Set name & personality
On this first tab you simply need to enter a name for your AI Agent and choose a personality. You can change both of these settings later, so pick a name and click “Next“.
Step 6: Knowledge
For your AI to be successful, it needs information. This page is where you choose what information you want your AI to be trained on so that it can learn about your business.
If you already have content within the HubSpot ecosystem you can simply pick that from the dropdown menu.
If you have files to upload, click “Choose files” and you can upload the following file types: .docx, .htm, .xhtml, .cfg, .pptx, .mpg, .conf, .mpeg, .csv, .json, .html, .text, .txt, .mp4, .pdf, .rst, .avi, .mov, .md, .webm, .xml, and .xls.
If you want to train from a public website, you can provide the URL under “public URL” and the AI will be trained on that one webpage provided. To make the AI also train on the links found on that page (to learn from the whole website, not just one page) you should tick the “Import related URLs” checkbox.
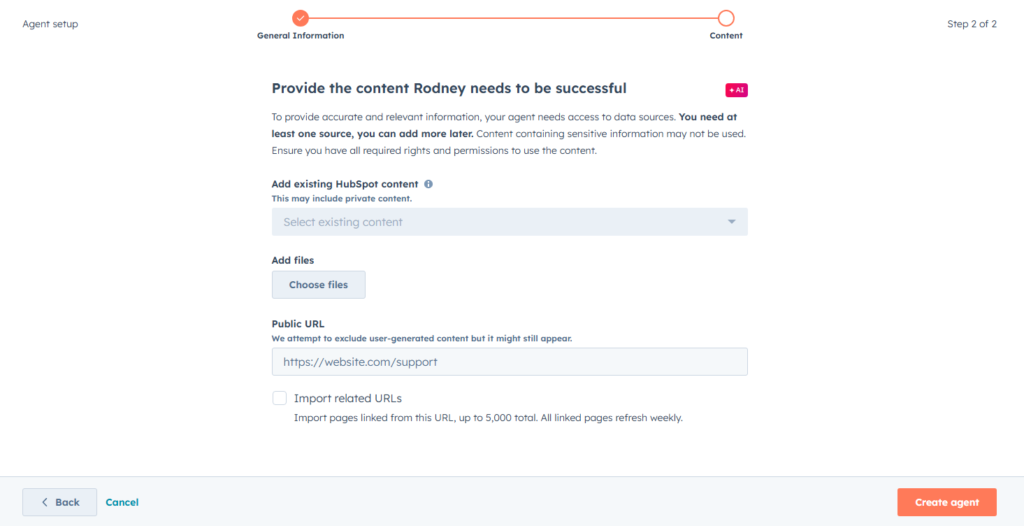
If you want to add information from non-public sources, unfortunately HubSpot requires the URL to be publicly available so it can be trained on. If you are looking to train on information behind authorisation, or in Notion pages etc, then there are other solutions available that might work better for you.
Once you have chosen your knowledge, click “Create agent” to move on.
Step 7: Testing and Optimisation
That’s the basic setup complete! You’ll now be on the Customer Agent dashboard and you should see “Test” in the top right. Click the test button to open a page where you can try out your Breeze Customer Agent.
During testing, you might find the AI needs some tweaking – you can explore further settings within the Customer Agent dashboard to change the Brand voice and add more knowledge to hopefully bring the AI up to your standard.
The ability to add Custom Instructions (ie to handle certain situations differently) is currently missing from HubSpot’s AI Chatbot; so if you would like the AI to be more flexible, you might need to use another solution. At the time of writing HubSpot is offering a trial period to test out customer agent before they start charging for credit consumption, this time period begins from when you connect Breeze to your channel, so be sure to give it a good test quickly! (Please double check that this free credit offer applies to your account before consuming credits!)
Additional Setup Details & Troubleshooting
Fix”Inbox isn’t connected to Chat Channel”
If you see the message “This inbox isn’t connect to the chat channel” while trying to set up your chatflow, here we show you how to resolve this.
If you are midway through setting up a chatflow, click Cancel, then you should see the icons on the left hand side again.
Then go to “CRM” -> “Inbox” and you will see a page to choose what to connect your inbox to. Select “Chat“.
After clicking “Chat” you might be taken through the “first time setup” steps if you haven’t done this before. You can skip through all this, as these settings will mostly become irrelevant while you are setting up your chatflow. For a walkthrough of this initial setup, please see First time chat widget setup, but you can safely just skip through these steps if you like as we will address these choices during setup of your chatflow.
Now that you’ve fixed that, you can head back up to Choose your workspace to carry on the setup process.
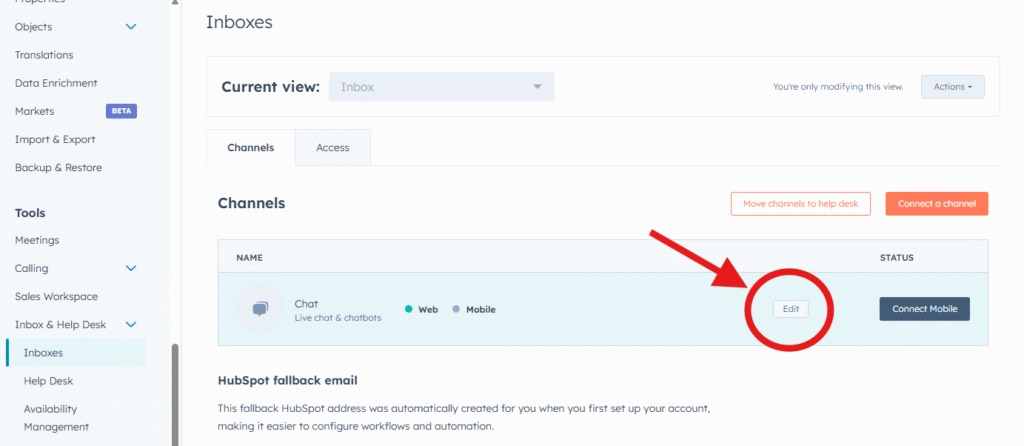
Change Appearance of your HubSpot Chat Widget
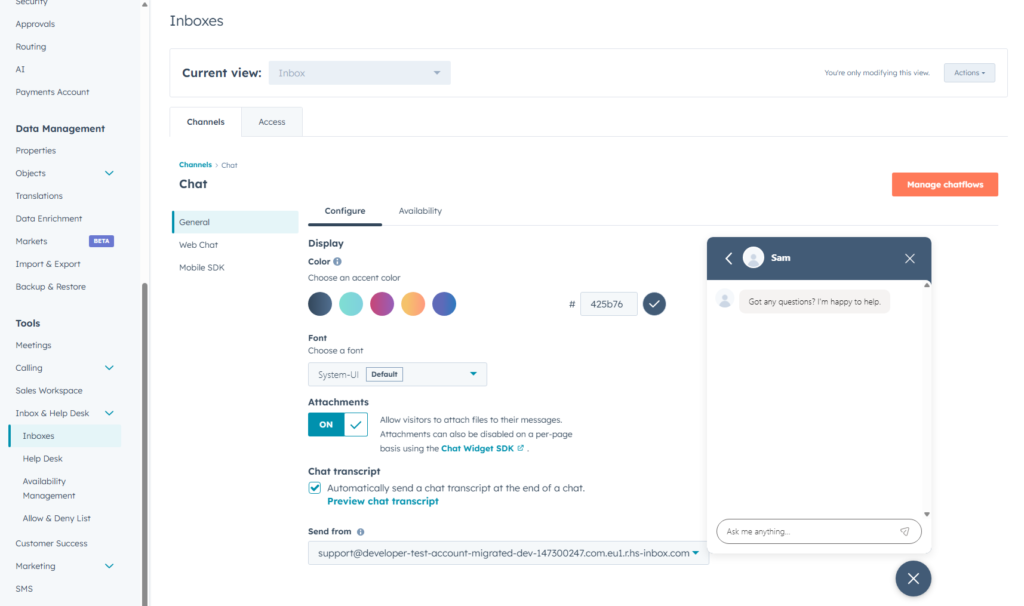
Go to settings -> tools -> inbox & Help Desk -> inboxes -> hover over the Channel for which you want to change the appearance and click Edit. then select colour scheme, position, font.
Then you can choose the colour scheme, and font for you chat widget. You can also choose the availability of your chat widget here, but if you’ve used the chatbot builder to define an automated flow, you’ll probably want to set this to “Chat is available 24/7“.
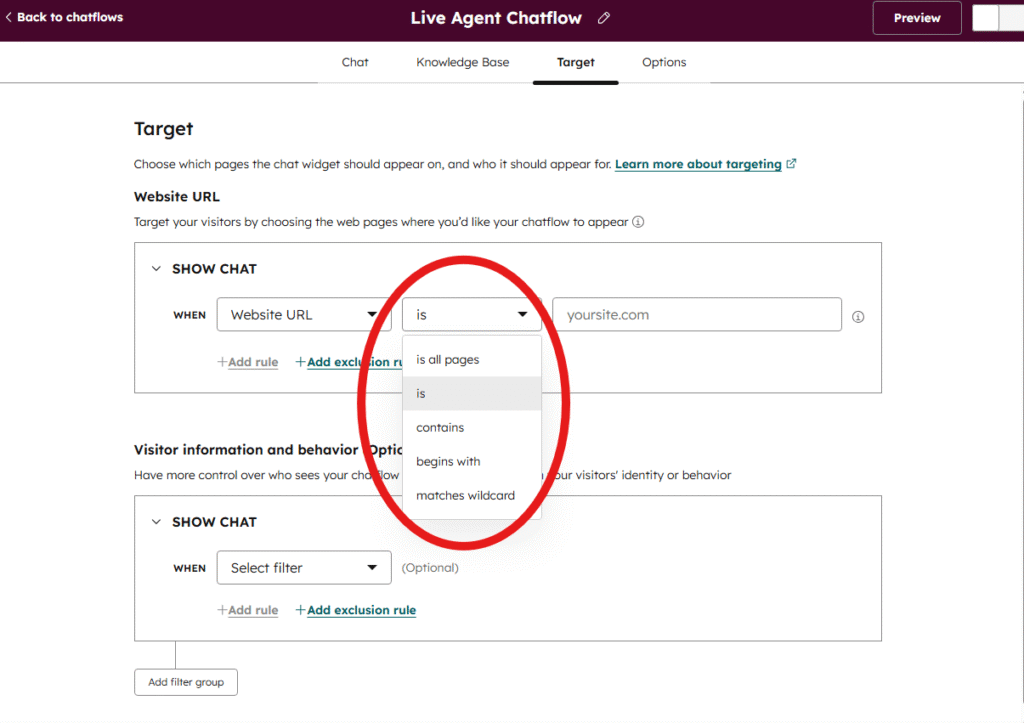
How to Set Chatflow Target Conditions
The “Target” tab lets you decide where or for who your chatflow will appear. You can define conditions by URL (webpage) to only show on certain pages (or to not show on certain pages), and can use visitor information as well (to show/hide depending on the visitor, regardless of URL), and a combination of both!
Control by Website URL
This lets you choose conditions when to show your chat widget. You can add multiple criteria to work alongside each other. You can choose conditions to Show the chatflow and conditions to Hide the chatflow. They are all considered at the same time, so please ensure the conditions you set don’t cancel each other out!
For Website URL conditions, you can use:
- “is all pages” – to show the chatflow everywhere,
- “is” – for an exact URL match, if you want the chatflow to appear on just one webpage (you can add multiple rules to capture multiple pages),
- “contains” – to match with a certain phrase anywhere within your chosen webpage urls.
- “begins with” – to match with a phrase at the beginning of your webpage url.
- “matches wildcard” – to match with a url, but with a middle portion as wildcard.
For example you might only want your chat widget to appear within a certain subdomain, such as your app. So you might choose to set:
"Website URL" -> "contains" -> "app.yoursite.com"
This would mean the chatflow would only appear when that condition was met.
Alternatively, you can also define when NOT to show the chat widget. To do this, click “Add Exclusion Rule” which will make a similar box appear where you can set conditions in the same way as above, but this time if a condition is met the Chatflow will be hidden.
So for example if you wanted your Chatflow to appear on all your webpages, except those in your blog folder, you could set the Hide Chat condition as:
"Website URL" -> "contains" -> "/blog/"
But please note that HubSpot will let you add whatever conditions you like here, so do make sure that your conditions don’t argue against each other!
As well as Website URL, you can also choose the “Query Parameter” option which will use the same principle as above, but only relevant to the query parameter of your webpages.
Control by Visitor information and behaviour
Similarly to the above, you can decide when to show a chatflow or hide a chatflow based on Visitor information.
You can choose to show/hide the chatflow depending on the following Visitor information:
- is on one of your segmented lists,
- is a contact or is not a contact (unknown),
- is logged-in or not logged-in
- is using a certain Device type
- is from a certain Country, or uses a certain langauge,
- has viewed a Form,
- based on days since last visit, or their session count,
- what pages they have viewed previously.
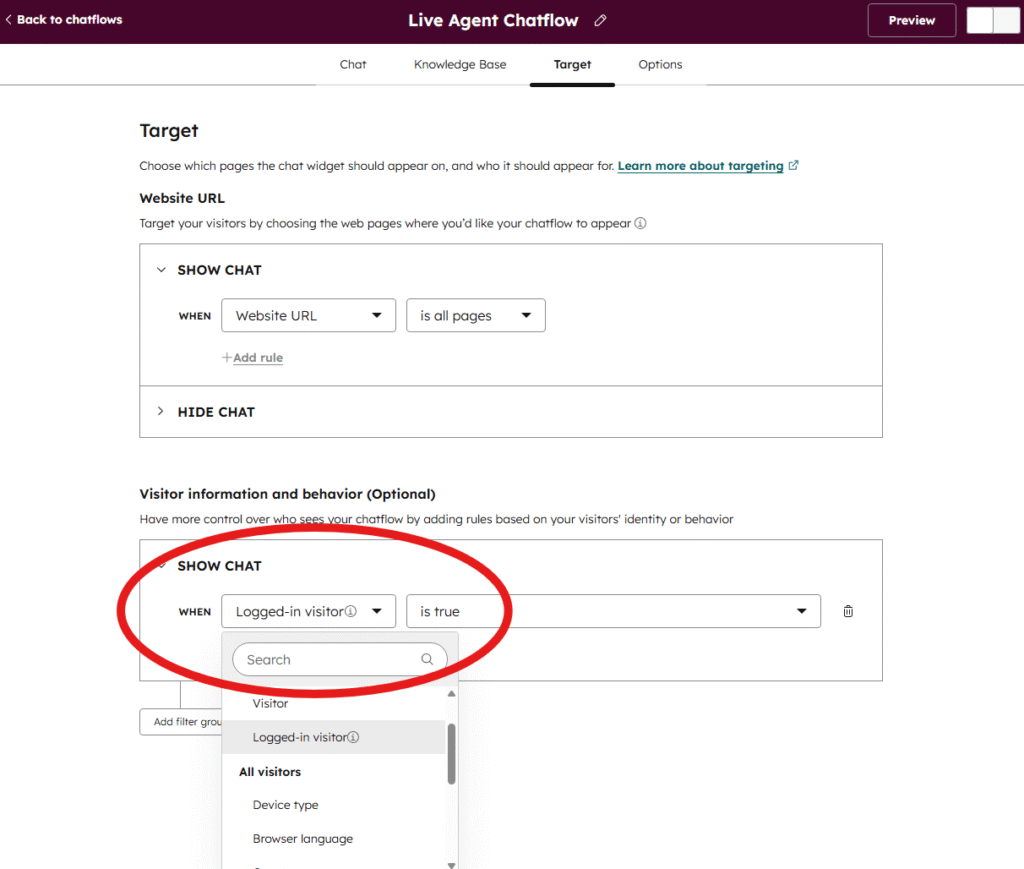
You can provide conditions to “show” and conditions to “hide” the chatflow based on the above criteria.
Be sure to consider that one User will likely fall into multiple conditions so please choose your show/hide conditions carefully.
Back to the rest of the flow
Once you’ve set your Target conditions, you can move on with the rest of setup:
- Continue setup for a Live Agent chatflow, next is the “Options” tab.
- Continue setup for a Rule-based chatflow, next is the “Display” tab.
HubSpot Chatbot Builder Limitations
Although HubSpot markets their chatbot builder as “free”, many useful features are locked behind expensive plans.
A quick recap of availability of each chatflow per plan is below, for full details, see earlier sections in this article:
- Live Agent – available on any plan, doesn’t include any automations but can be used with third party AI integrations from the HubSpot marketplace to add AI functionality without upgrading.
- Rule-based chatbot – available on any plan, but limited to simple data collection unless on Professional plan or higher. See the detailed table above for details on bot actions per plan.
- Customer Agent – only available if you are on Professional plan or higher, then charged at $1/conversation.
The reality: Free and Starter users are limited to simple data collection bots – asking a customer for their email, name etc before handing over to a human (or third party AI integration). Any conditional logic, knowledge base integration, or advanced automation requires a Professional plan or higher.
If you’re wanting to use a rule-based chatflow, being able to use the if/then branches is essential for creating any meaningfully useful conversation paths for your chatbot. But, they’re only accessible to Professional Plans and higher. It’s seriously worth considering your other options for reliable customer support automation on a free/starter plan before upgrading your HubSpot plan.
The Problem with Breeze Customer Agent
Breeze Customer Agent is natively built in to the HubSpot ecosystem so can be a powerful tool, but you pay for that native integration. HubSpot do make it easy to start using Customer Agent, but it’s not cost-effective. Here’s what it actually costs using HubSpot’s Breeze:
Plan requirement: Service Hub Professional or Enterprise
HubSpot Credit costs: 100 credits per conversation (~$1 per conversation)
Real-world example: If you handle 500 support conversations per month:
- Included credits cover: 30 conversations (Professional)
- Additional credits needed: 470 × $1 = $470/month in overage charges
For a detailed review of Breeze’s capabilities and limitations, read our HubSpot Breeze Customer Agent article.
Want to add AI to your HubSpot chatbot? There are equivalent third party tools that can provide high quality AI customer support directly within your HubSpot account, we explain the better alternative below.
Workarounds for Free and Starter Plan Users
If you’re on HubSpot Free or Starter and need more functionality, here are your options.
We also have a detailed guide on how to add AI to HubSpot chat widget, on any plan.
Option 1: Use Simple Questions before Live Chat
Even without if/then branches, you can still create useful rule-based bots by:
- Using the Simple Questions to collect information that you would otherwise have to start collecting, to save your team time (ie “what is your account number”, “please describe the bug” etc)
- Creating multiple bots for different pages/purposes, so the fixed questions are correct for the situation.
- Then pass over to Live chat, having already collected some data, and already put-off any times wasters or spam.
Limitation: You can’t route conversations intelligently or personalize in real-time. The Live Chat workload is marginally reduced but this adds friction for the customer which may not be your intent.
Option 2: Use HubSpot Live Chat and External AI combined
Keep HubSpot’s live chat but add a high quality third-party AI solution that:
- Works directly within your HubSpot chat widget and your inbox
- Doesn’t require upgrading your HubSpot plan (works on any plan)
- Provides AI capabilities at a fraction of the cost
This is where tools like Resolve247 come in, keep reading below!
A Better Alternative: Add AI to HubSpot Without Upgrading
What if you could get excellent AI chatbot capabilities on any HubSpot plan, at a fraction of the cost of HubSpot credits?
Resolve247 integrates directly with HubSpot to provide:
- AI-powered answers trained on your website and knowledge base
- Works on any HubSpot plan (Free, Starter, or Professional)
- Affordable, flat monthly rate – no expensive surprises!
- Anti-hallucination guarantee – only answers from the information you provide
- Setup in minutes – not weeks
How Resolve247 Compares to HubSpot Breeze
| Feature | HubSpot Breeze | Resolve247 |
|---|---|---|
| Plan required | Professional+ | Works on any plan |
| Starting cost | $50/mo for 50 conversations | $35/mo for ~800 conversations |
| Per-conversation cost | $1 per conversation | $0.04 per conversation |
| Anti-hallucination | No | Yes |
| Works with existing HubSpot | Native | Integrates seamlessly |
| Human handover | Yes | Yes |
| Create ticket when human required | Yes | Yes |
Among other benefits, from a cost-basis alone using Resolve247 is a great choice, providing a 96% cost reduction over HubSpot’s Breeze Customer Agent, while getting great AI chat capability!
Resolve247 includes a 30 day free trial, and it’s simple to setup, and has a money-back guarantee if you’re not happy. If you’re using HubSpot’s chat widget, do yourself a favour and try out Resolve247!
To see how other tools compare, check out our roundup of the Top AI Chatbots for HubSpot, or our HubSpot AI Chatbot Alternatives article.
This is the BEST new subscription tool we’ve signed up. It’s chatbot trained on our helpdesk articles and has reduced our support workload by 50% It’s correct, doesn’t hallucinate and even does sales for us 🤯
Elston Baretto, Founder, Tiiny Host
How to Add Resolve247 to Your HubSpot Chat
Setting up Resolve247 with HubSpot takes just a few minutes:
- Sign up for a free trial at resolve247.ai
- Tell your AI where to learn from – Simply provide the URL of your website, knowledge base etc and the AI will train itself on that information.
- Connect to HubSpot – Link your HubSpot account in settings in a couple of clicks.
- Ready to Go! – You can test your AI; when you’re ready the AI will appear in your HubSpot widget.
No code required. No expensive upgrades. No per-conversation fees.
For full step-by-step instructions, including customisation, see our full article on How to Connect HubSpot to Resolve247.
Great product – simple to implement and use. Exceptional customer support. Thank you!
Chris Ziomek, CEO, Breezy Med
Which HubSpot Chatbot option should you choose?
HubSpot’s chatbot builder offers three chatflow types (live chat, rule-based bots, and AI customer agents), but the most useful features are locked behind expensive Professional plans.
If you’re on HubSpot Free or Starter and want:
- If/then branches → You need Professional
- AI functionality → Resolve247
If you are on a Professional/Enterprise plan and want:
- Reduce cost of AI conversations → See our full article on ways to reduce cost.
- More control over AI behaviour → Resolve247 (using the Custom Instructions feature)
- See Conversation Clustering and knowledge gaps → Resolve247 (using the Insights feature)
- High quality AI answers → Resolve247 (with an 82% deflection rate)
Or you can add a tool like Resolve247 that:
- Works with any HubSpot plan (or standalone!)
- Costs a fraction of the price (96% cheaper), with high quality answers (82% deflection rate)
- Provides AI chat without unpredictable per-conversation fees
- Sets up in minutes, not weeks
Conclusion: Is the HubSpot Chatbot Builder Worth It?
The HubSpot chatbot builder is a solid option for basic lead qualification and simple automations – if you’re willing to work within its limitations. For anything beyond basic data collection, you’ll either need to upgrade to Professional or look at alternatives to the HubSpot chatbot builder.
The reality is that while the basic HubSpot chatbot builder is free, HubSpot’s AI chatbot (Breeze) pricing puts it out of reach for most small businesses. When you factor in the base subscription, per-conversation credits, and onboarding fees, HubSpot’s costs can easily become unmanageable.
Third-party solutions like Resolve247 offer a practical alternative: AI-powered chat that works with your existing HubSpot plan at a fraction of the cost. You get 24/7 automated responses, knowledge base training, and human handover capabilities – without the cost of upgrading your HubSpot plan.
See our full HubSpot AI Chatbot vs Resolve247 article for a detailed side-by-side breakdown.
Ready to add AI to your HubSpot chat? Start your free 30-day trial of Resolve247. No credit card required, 30 day free trial, works on any HubSpot plan.
Frequently Asked Questions
Is HubSpot’s chatbot builder really free?
The basic chatbot builder is free, but many features (if/then branches, AI, knowledge base search) require Professional plans. The HubSpot AI features then consume credits on top of the plan subscription.
Can I use AI in HubSpot’s chatbot on the Free plan?
Yes. Although Breeze Customer Agent (HubSpot’s AI) requires a Professional or Enterprise subscription, you can add third-party AI tools like Resolve247 that work with any HubSpot plan.
How much does HubSpot’s AI chatbot cost per conversation?
Breeze Customer Agent costs 100 credits per conversation, which equals approximately $1 per conversation. Professional plans include 3,000 credits (30 conversations) per month.
What’s the cheapest way to add AI to HubSpot?
Third-party tools like Resolve247 are easily the most cost-effective way to add AI to your HubSpot chat widget. Plans start at $35/month for 2,000 messages/mo (~800 conversations), equivalent to just $0.04/conversation.
Can I keep my existing HubSpot setup and add AI?
Yes. Tools like Resolve247 integrate with your existing HubSpot chat widget. You don’t need to switch platforms or change your workflow. You can easily turn Resolve247 on and off without changing your existing workflow.